Urban Health Training Module III - Newborn and Child Health HUP

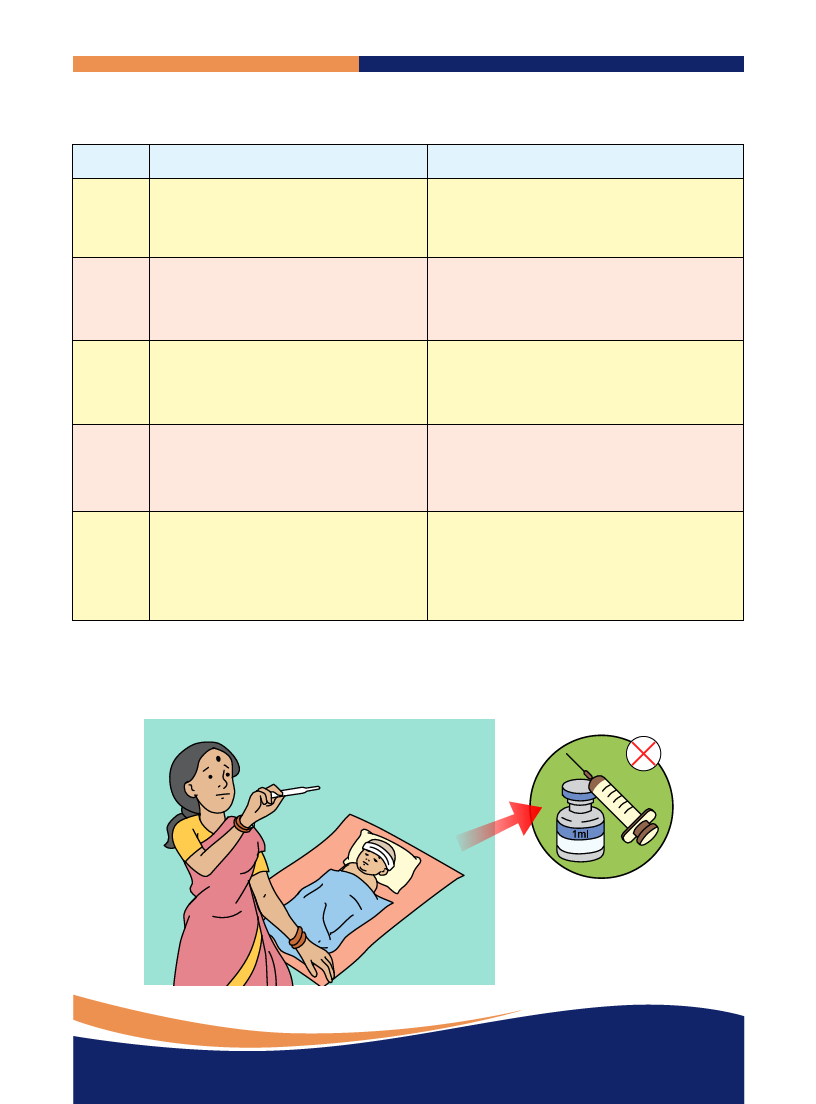
Urban Health Training Module III - Newborn and Child Health HUP


1 Pages 1-10

▲back to top


1.1 Page 1

▲back to top


Urban Health Training Module
Module III:
New Born and Child Health
1
Health of the Urban Poor (HUP) Program Newborn and Child Health Training Module - HUP

1.2 Page 2

▲back to top


Prepared for:
Health of the Urban Poor (HUP) Program
Population Foundation of India
B-28, Qutab Institutional Area, New Delhi-110016
Population Foundation of India is implementing Health of the Urban Poor (HUP) Program which is
supported by USAID/ India and working in 8 states and 5 demonstration cities – (Pune, Bhubaneswar,
Jaipur, Delhi and Agra). Plan India and Bhoruka Charitable Trust (BCT) are the implementing
partners in Pune and Jaipur respectively.
Prepared in technical collaboration with:
“CINI Chetana, the training wing of Child In Need Institute”
Vill & P.O. : Amgachia, West Bengal
Special Inputs:
Dr. Swati Mahajan (Demonstration Officer)
Dr. Mainak Chatterjee (Public Health Specialist)
Dr. Jatin Dhingra (Consultant, City Demonstration)
Dr. Naresh Potter (City Coordinator, Jaipur)
Dr. Sainath Banerjee (Chief of Party)
Note : Replication of any content of the document should be done with consent from HUP
2
Newborn and Child Health Training Module - HUP

1.3 Page 3

▲back to top


CONTENTS
I. Introduction
II. Training Objective
III. Training Schedule
Session 1 :
Session 2 :
Session 3 :
Session 4 :
Session 5 :
Session 6 :
Session 7 :
Session 8 :
Session 9 :
Session 10 :
Session 11 :
Session 12 :
Session 13 :
Session 14 :
Session 15 :
Session 16 :
Observing the new born at 30 seconds and 5 minutes
Essential newborn care/ Care of newborn at the time of birth –
Eye care and Umbilical Cord Care, Cleaning and Wrapping
First Examination of the New born- What all to see- Temperature, Breathing,
Weighing
Keeping the Newborn warm
Breast feeding
Schedule of Home Visits for care of the Newborn
Immunization Schedule
High-Risk Assessment and the Management of Low Birth Weight/Preterm
babies
Birth Asphyxia
Sepsis
Assessing the Sick Child
Assessing and Classifying Fever
Assessment and Management of Diarrheal Disease
Management of Acute Respiratory Infections
IMNCI
Home Based New Born Care- SEARCH Model
Annexures
1. Format for first examination
2. Checklist for weighing the newborn
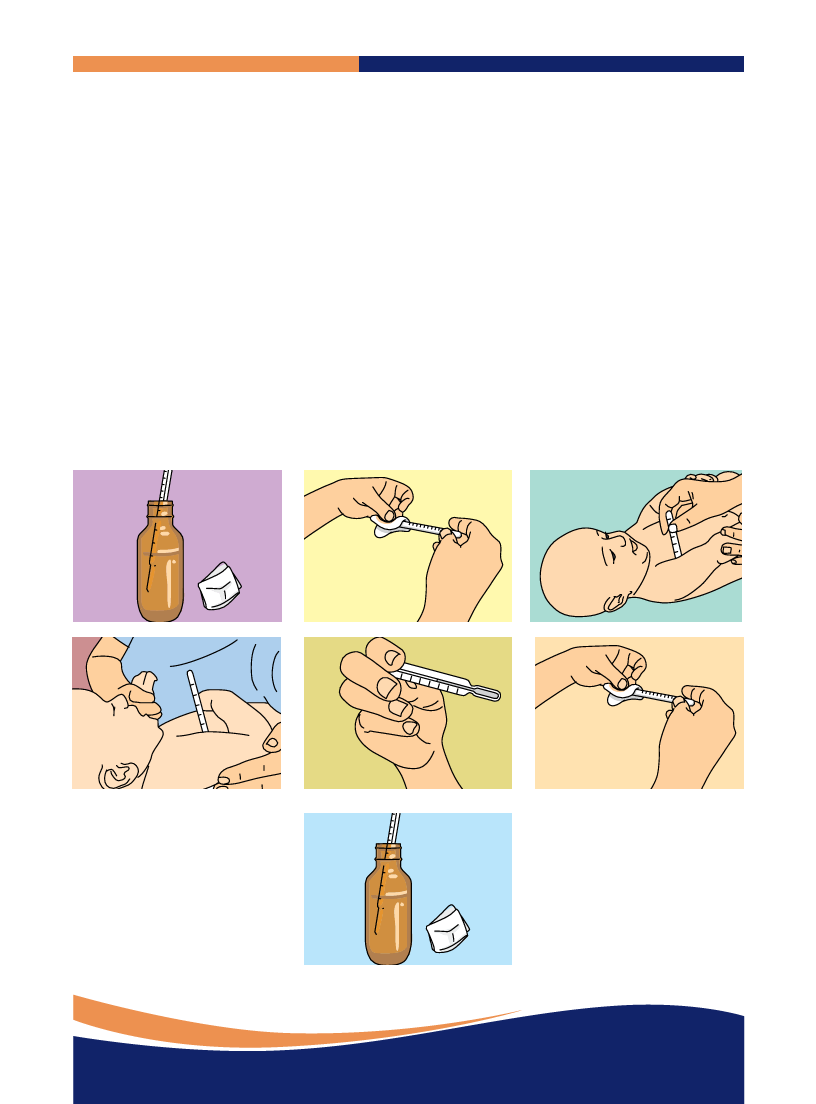
3. Checklist for measuring temperature
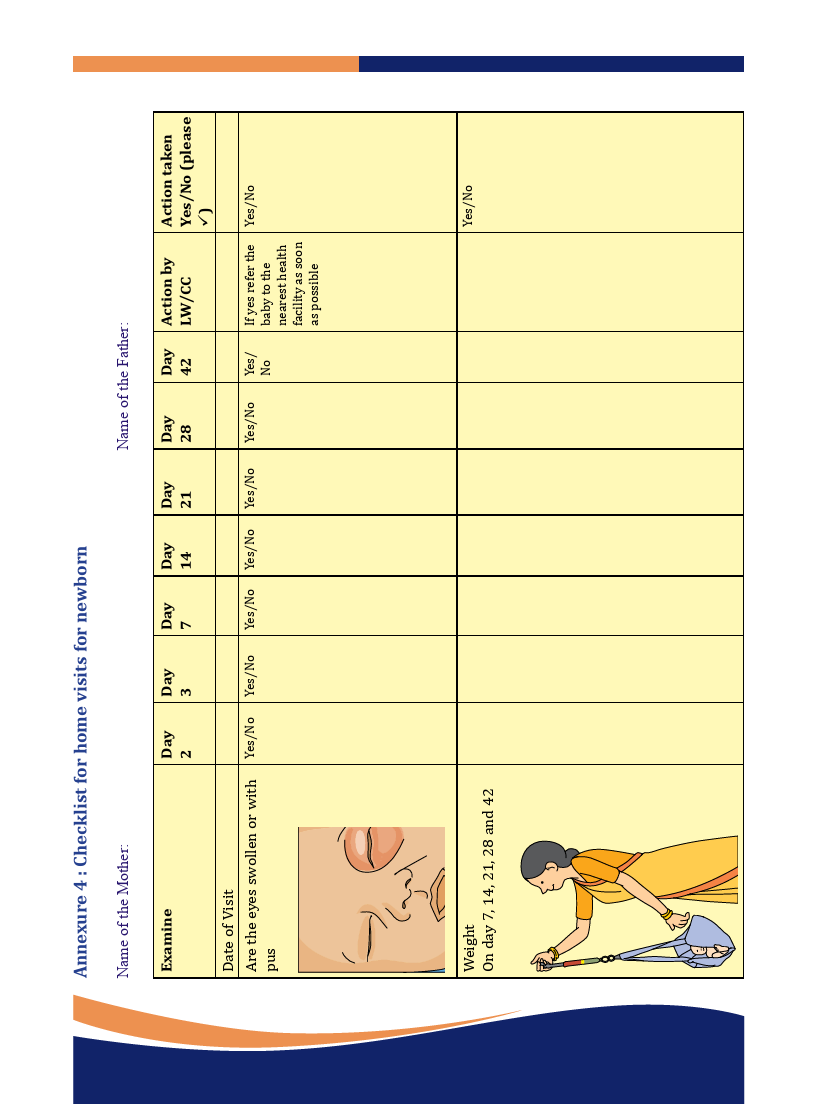
4. Checklist for home visits of newborn
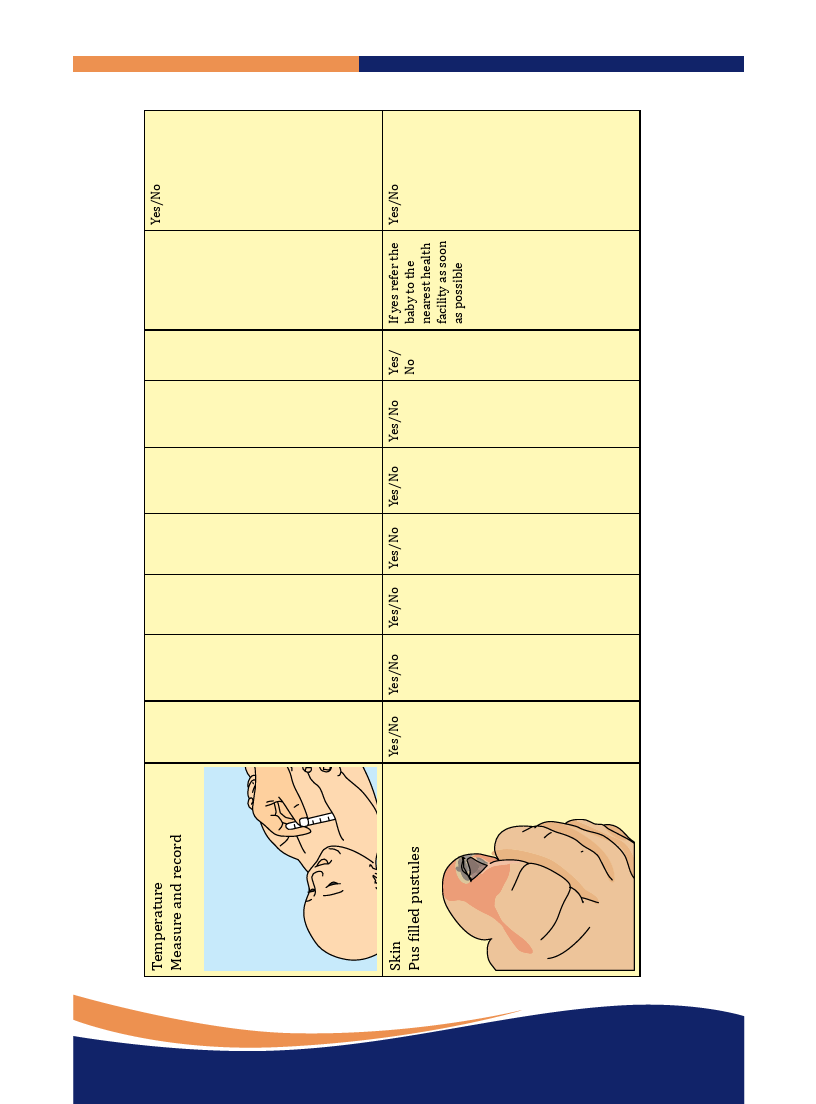
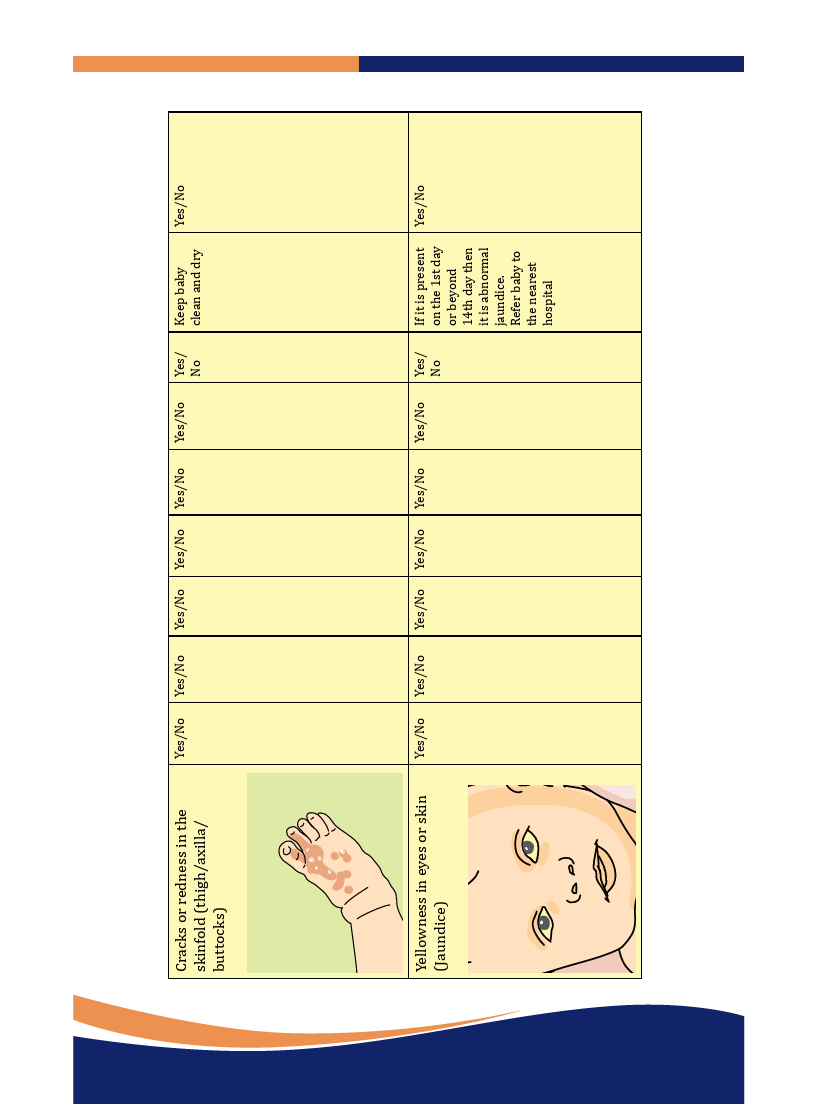
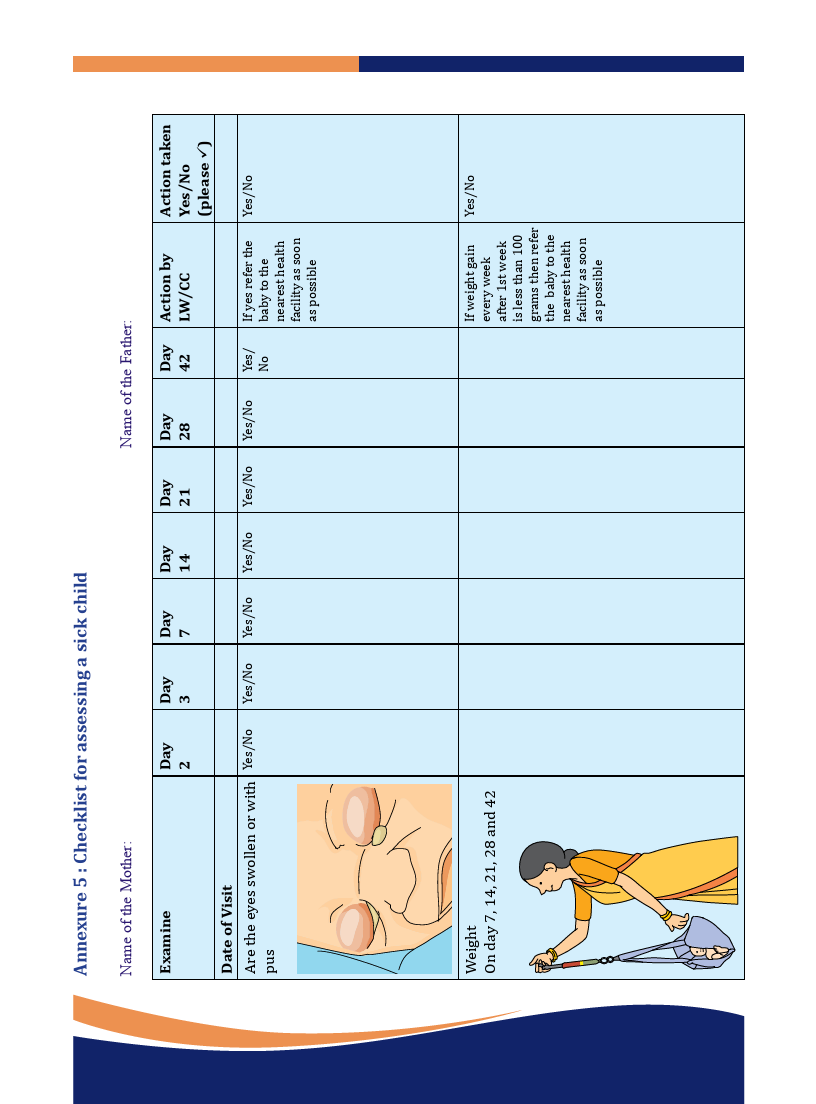
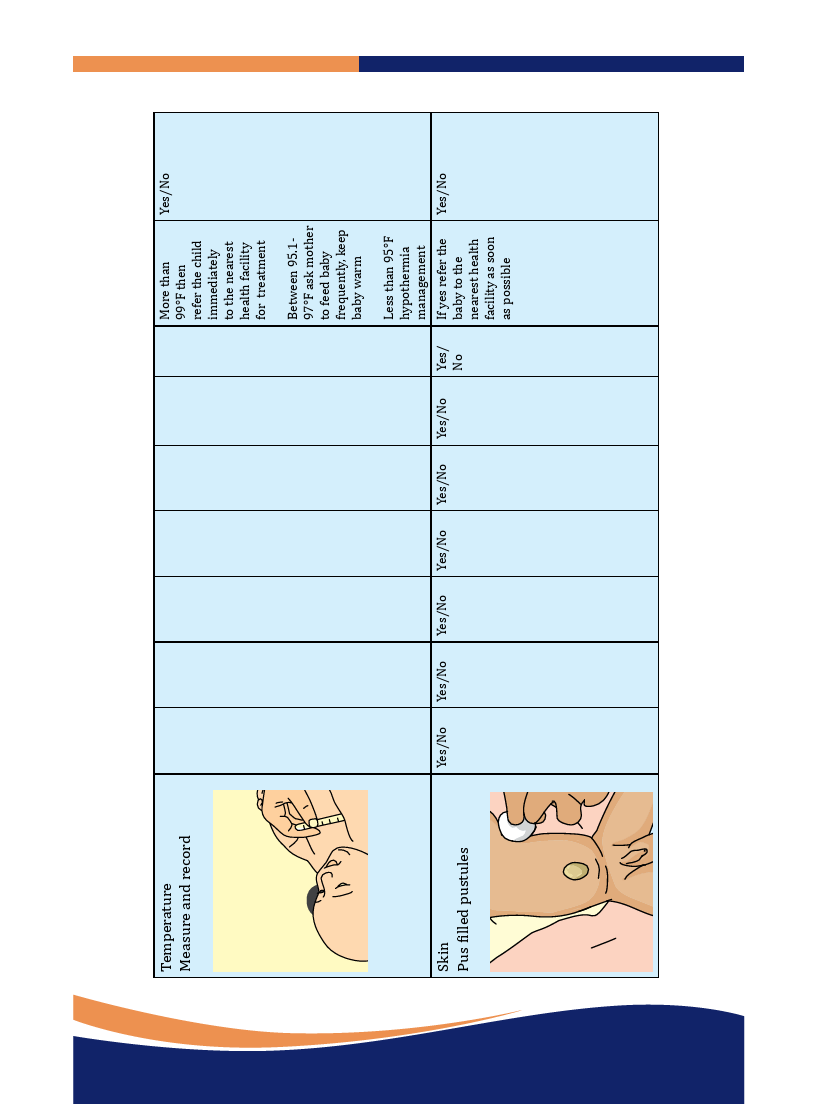
5. Checklist for assessing a sick child
1
Newborn and Child Health Training Module - HUP

1.4 Page 4

▲back to top


Introduction
Over the last four decades, Population Foundation of India (PFI) has emerged
as a national level non-governmental organization extending its support to
different institutions working on Health issues. PFI has a strong role play at
policy level advocacy and research on population issues in the country. It has
its network extended in 20 states of the country.
PFI is the prime partner of the Health for Urban Poor (HUP) Program which
has been designed to improve the health status of the urban poor by adopting
effective, efficient and sustainable strategic intervention approaches, adopting
the principle of convergence of the various development programs. Running
adjacently in five cities, the program aspires for a responsive, functional and
sustainable health system that provides need based, affordable and accessible
quality health care, improved water, sanitation and hygiene for the urban
poor.
On the other hand, CINI Chetana Training Unit has been performing as a support
team with HUP-PFI due to its technical expertise for developing TOT module as
well as imparting TOT to the HUP implementing City partner organizations.
Although the Millennium Development Goals (MDGs) are nearing an end
in 2015, the statisticians tell that India has a high concentration of children
suffering from ARIs and Diarrhea (70.5% and 61.5% respectively) due to wrong
behavioral practices or lack of adequate knowledge/awareness. In India, while
40% of children less than 3 years of age are under weight at the same, around
22.9% of children are wasted in the same category .
The life cycle approach propagated by CINI, promotes health care initiative of
mother, child as well as the adolescents. As a result, the program organized
the Training of Trainers (TOT) on Maternal Health at Jaipur from 18th to 20th
January, 2012. Around 25 participants from all partner organizations took part
in the training which included the country office managers to link workers.
Thus, the initiative taken remains incomplete if new born and child health is
not followed up subsequently. The module has an insight into the new born
care right from the birth which includes essential observation, examination,
immunization, breast feeding, nutrition, including care against fatal ailments
and different schemes.
With this belief, CINI dish out this module on New Born and Child Health which
will enrich the participants on the best preventive and promotive measures, in
terms of new born and child health care.
2
Newborn and Child Health Training Module - HUP

1.5 Page 5

▲back to top


Training Objective
To equip the participants with adequate knowledge and skill about Home based New Born and
Child Health care up to 2 years of age so that they can perform their duties more effectively.
Schedule of 4 days training for frontline workers of the Health of the Urban Poor
(HUP)Program
Day/ Time Topic
Sub Topic
Method(s)
Material
Day 1
9:00 am
10:00 am to
10:30 am
10:30 am to
11:15 am
11:15 am to
11:30 am
11:30 am to
12:30 pm
12:30 pm to
1:30 pm
2:15 pm to
3:00 pm
Registration
Introductory
session
Observing the
new born at 30
seconds and 5
minutes
Tea Break
Brief introduction to the
Newborn and Child Health
module
Objective and Ground rule
setting
Filling-up of pre-training
questionnaire
- What and how to observe
- Identifying / decision of
live or still birth
Filling up of
registration sheet
Stage setting
exercise
Registration
sheet
Pictures
Interactive
Chart paper,
discussion
pen, marker
Questionnaire fill-up Questionnaire
Interactive
discussion, card
game
Cards
Essential
newborn care
First
Examination of
the New born
- Immediate Eye Care
- Care of Umbilical Cord
- Cleaning of the newborn
- Procedure of wrapping
- Normal body temperature
- Measuring temperature
- Assess breathing
- Count the respiratory rate
Interactive
discussion,
demonstration
Interactive
discussion,
demonstration
1:30 pm to 2:15 pm
Lunch Break
Continuation - Normal Body Weight
Interactive
of previous
- Measuring Weight
discussion,
session
- Taking care of Low Birth demonstration
Weight / Mildly Under
Weight Babies
- Under Weight Babies
Mannequin,
cotton, cloth
Thermometer
Color coded
Spring
Balance,
Mannequin
3
Newborn and Child Health Training Module - HUP

1.6 Page 6

▲back to top


3:00 pm to
4:15 pm
Keeping the - Necessity to keep the baby Interactive
Newborn warm dry
discussion and
- Hazards of hypothermia demonstration
- Identification of
hypothermia by HUP
Link worker/Cluster
coordinator
Mannequin and
power point
presentation
4:30 pm to
5:30 pm
5.30 pm to
5.45 pm
4:15 pm to 4:30 pm
Tea Break
Continuation
of previous
session
- How to keep the baby
warm
– maintaining warm chain
– Re warm the baby
– Kangaroo care
- Management of
temperature in newborn
- Assignment of evening
task
- Daily session feedback
- Learning of Day 1
Interactive
discussion and
demonstration
Filling up of Daily
session feedback
sheet
Mannequin and
power point
Daily session
feedback sheet
Day 2
9:00 am to
9:15 am
9:15 am to
10:15 am
Recapitulation
Breast feeding
- Recapitulation of previous
day’s session
- Advantages of breast milk Interactive
- Early initiation of breast discussion
feeding - Colostrum and
its advantages
- Exclusive breast feeding
for first 6 months
- Problems of late initiation
of breast feeding
- Continuing breast feeding
as supplementary food
10:15 am to
11:15 am
Schedule of
Home Visits
for care of the
Newborn
- Necessity of home visit
- Schedule of home visit
- Responsibility of the LW/
CC during each
- day of home visit
Group work,
Interactive
discussion
11:15 am to 11:30 am
Tea Break
Chart paper,
pen, marker
Chart paper,
pen, marker
4
Newborn and Child Health Training Module - HUP

1.7 Page 7

▲back to top


11:30 am to Immunization
12:30 pm
- National Immunization Group work,
Schedule
Interactive
- Common Side effects of discussion
vaccines
- When Vaccines should not
be given
- Role of HUP link worker/
Cluster coordinator in
Immunization
Chart paper,
pen, marker
12:30 pm to
1:30 pm
High-Risk
-
Assessment
of Low Birth -
Weight/ Preterm
babies
-
Identifying a high risk
newborn
Caution for the Family
members of LBW/preterm
baby
Role of LW/CC
Interactive
discussion
Chart paper,
pen, marker
2:15 pm to
3:45 pm
3:45 pm to
4:15 pm
1:30 pm to 2:15 pm
Lunch Break
Management - Advantage / Necessity of Demonstration
of Low Birth
Breast milk for LBW/Pre- with Breast
Weight/Preterm term babies
model, interactive
babies
- Procedure for expressing discussion, mock
Breast Milk
counseling
- Counseling points for
LBW/ preterm babies
Birth Asphyxia
- Definition
Interactive
- Consequences (both
discussion
immediate and long term)
- Warning signs of asphyxia
during labor
Breast model
Chart paper,
pen, marker
4:30 pm to
5:30 pm
11:15 am to 11:30 am
Tea Break
Sepsis
- Define sepsis
- Causes of neonatal sepsis
- Preventive measures
- Warning signs of sepsis
and referral
Interactive
Chart paper,
discussion, role play pen, marker
5
Newborn and Child Health Training Module - HUP

1.8 Page 8

▲back to top


5.30 pm to
5.45 pm
- Assignment of evening
task
- Daily session feedback
- Learning of Day 2
Filling up of Daily
session feedback
sheet
Daily session
feedback sheet
Day 3
9:00 am to
11:30 am
11:30 am to
12:30 pm
12:30 pm to
1:30 pm
Visit to Health - Observational visit to
facility
Health facility
Consolidation - Presentations on the
of observational observations of field visit
visit
Assessing the
Sick Child
- Common illnesses and Interactive
danger signs
discussion
- How to assess a sick child
for danger signs
Chart paper,
pen, marker
Chart paper,
pen, marker
2:15 pm to
3:15 pm
1:30 pm to 2:15 pm
Lunch Break
Assessing and - Assessment of fever– by Interactive
Classifying
asking mother / other
discussion, brain
Fever
family members or
storming
observation
- Classifying Fever
- Management of Fever
- Common causes of fever Demonstration for
- Signs of fever
the water sponging
- Method of Water Sponge
Chart paper,
pen, marker
3:15 pm to
4:30 pm
Assessment and - Identifying nature of
Interactive
Management
Diarrhea
discussion, brain
of Diarrheal - Assessing every child with storming
Disease
diarrhea for prevention
from dehydration
- How to Classify Diarrhea Demonstration for
- Oral Rehydration Therapy ORS preparation
- preparation procedure -
administration norm
- Home Available Fluids
- Referral for Diarrhea
- Prevention of Diarrhea
Chart paper,
pen, marker
6
Newborn and Child Health Training Module - HUP

1.9 Page 9

▲back to top


4:45 pm to
5:45 pm
4:30 pm to 4:45 pm
Tea Break
Management
of Acute
Respiratory
Infections
(ARI)
- Identifying the Signs of Interactive
ARI
discussion, brain
- Observing Chest-in-
storming
drawing
- Classification and
Management of Cough/
Difficulty in Breathing
- Home Based Management
for Minor Cough and Cold
- Danger Signs
Day 4
9:00 am to
9:15 am
9:15 am to
10:00 am
Recapitulation
Integrated
Management
of Neonatal
and Childhood
Illness
- Recapitulation of previous
day’s session
- About IMNCI Program Interactive
- Principles of IMNCI
discussion, brain
guidelines
storming
- Integrated Case
Management Process
(birth to 5 years)
Chart paper,
pen, marker
Chart paper,
pen, marker
10:30 am to
11:15 am
Home Based
New Born
Care (HBNC)
- SEARCH
Model
- Concept of HBNC in
SEARCH Model
- Contents of HBNC
Interactive
discussion, lecture
11:30 am to
12:45 pm
11:15 am to 11:30 am
Tea Break
Preparation for - Orientation on preparation Interactive
mock session
of session plan
discussion, lecture
- Norms of feedback
mechanism
- Preparation for mock
session by the participants
Chart paper,
pen, marker
Chart paper,
pen, marker
12:45 pm to
1:30 pm
2:15 pm to
3:00 pm
Mock session - Presentation by the
Mock session
presentation
participants divided in 6 presentation
groups (each of 15 min.) –
First 3 groups
1:30 pm to 2:15 pm
Lunch Break
Continuation
of previous
session
- Presentation by the
remaining 3 groups
7
Newborn and Child Health Training Module - HUP

1.10 Page 10

▲back to top


3:00 pm to
3:30 pm
3.30 pm to
4.00 pm
Feedback on
Mock session
Closing session
Feedback on Mock session
- Post Test Evaluation
- Daily session feedback
- Whole training evaluation
- Vote of Thanks
Filling up of Post Post Test
Test, training
questionnaire,
evaluation and Daily Training
session feedback evaluation
sheet
sheet, Daily
session
feedback sheet
8
Newborn and Child Health Training Module - HUP

2 Pages 11-20

▲back to top


2.1 Page 11

▲back to top


PART -A
NEWBORN HEALTH
9
Newborn and Child Health Training Module - HUP

2.2 Page 12

▲back to top


Session 1: Observing the new born at 30 seconds and 5 minutes
Objective:
At the end of the session, the HUP link worker/Cluster coordinator will be able to:
• Record observations of baby’s cry, breathing and limb movements, at 30 seconds and 5
minutes
• Determine that the new born is born alive, or is a fresh/macerated stillbirth
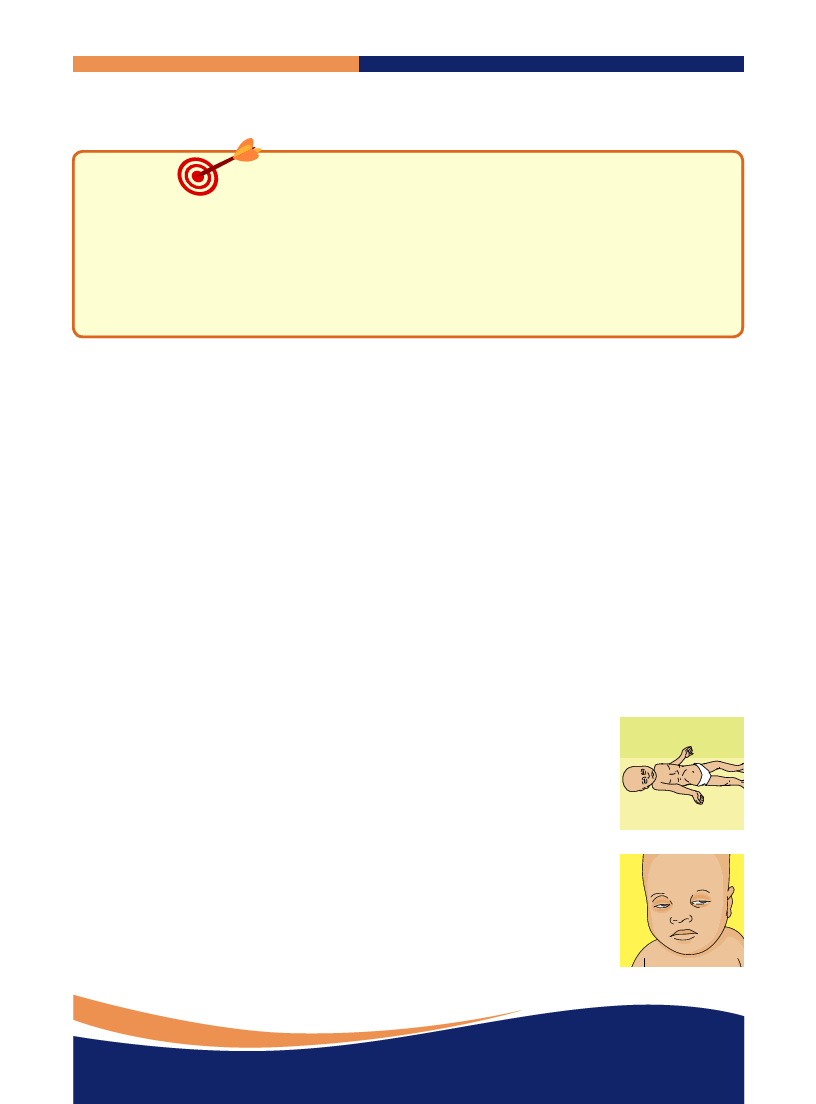
A baby with no cry makes no sound. Likewise, the baby who is not breathing has no movement in its
chest. With no limb movements the baby is termed is ‘limp’ – the arms and legs are not flexed (limbs
are called flexed when knees and elbows are bent and held close to the body).
(Only one “Yes” at 30 seconds is needed for the baby to be considered a live birth. For example,
if the baby was breathing but not crying and not moving at 30 seconds and at 5 minutes the baby is
considered to be live birth.)
Observations of Baby after Delivery: What to observe
1. Whether the baby is crying and the description:__________No cry/Weak cry/Forceful cry
2. Whether the baby is breathing and the description:__________Not breathing/Gasping/
Forceful breathing
3. Whether the baby moves its limbs and the description:__________No movement/Weak
movement/Forceful movement
Steps for HUP link worker/Cluster coordinator to take “just after” the baby is born (If the
baby is born at home, or if you are present at the delivery)
• If the fluid is yellow/green, as soon as the head is seen (even before delivery of complete baby),
clean the mouth of the baby with gauze piece
• As soon as the baby is born, note the time of birth and start counting time
• Observation of baby at birth or within the first 30 seconds and at 5 minutes after birth for
movement of limbs, breathing and crying. The figure below will enable the assessment of whether
the new born will be recorded as a live or still birth.
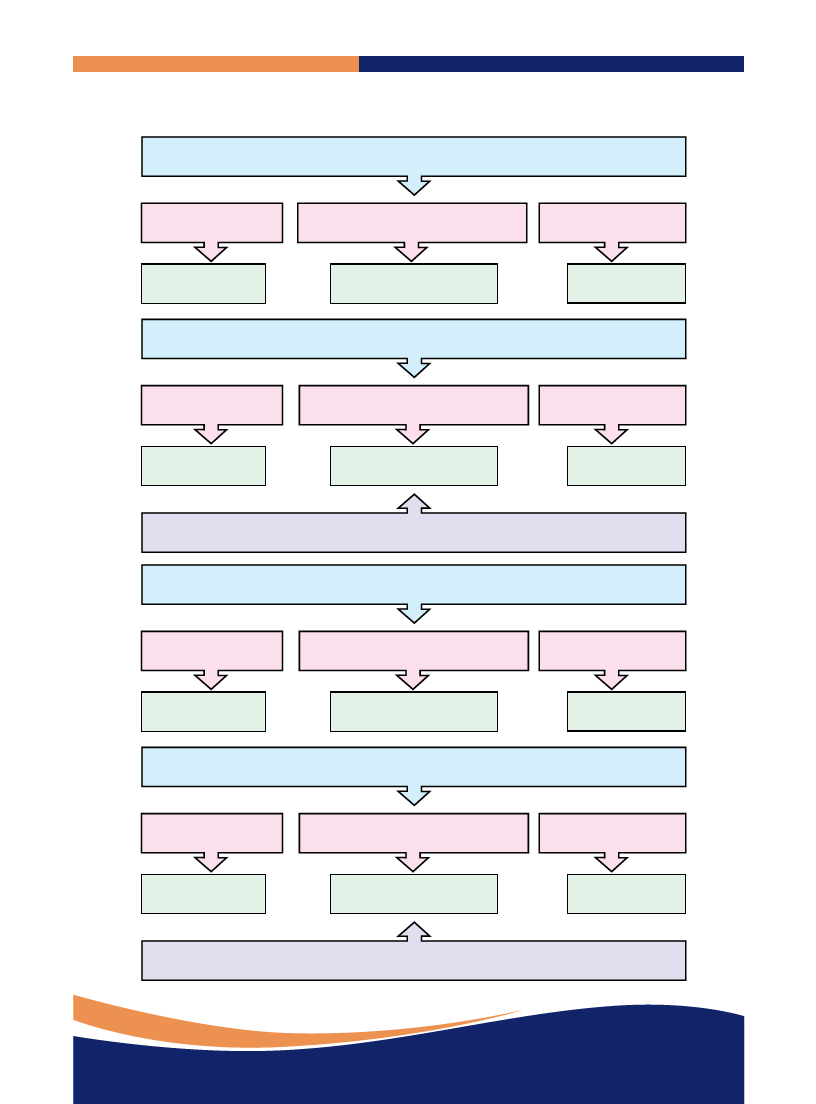
All six have to be “No” to declare a still birth. Even if one is “yes” the baby will be declared
as live birth.
• If there is no cry or a weak cry, if there is no breathing or weak breathing or gasping, this condition
is called Asphyxia.
10
Newborn and Child Health Training Module - HUP

2.3 Page 13

▲back to top


Cry
No
Cry
No
Cry
Yes
Cry
Yes
Still birth Decision Tree
Examination at 30 Seconds
Limb Movement
Breathing
No
No
Examination at 5 Minutes
Limb Movement
Breathing
No
No
Decision is Still Birth
Examination at 30 Seconds
Limb Movement
Breathing
Yes
Yes
Examination at 5 Minutes
Limb Movement
Breathing
Yes
Yes
Decision is Live Birth
11
Newborn and Child Health Training Module - HUP

2.4 Page 14

▲back to top


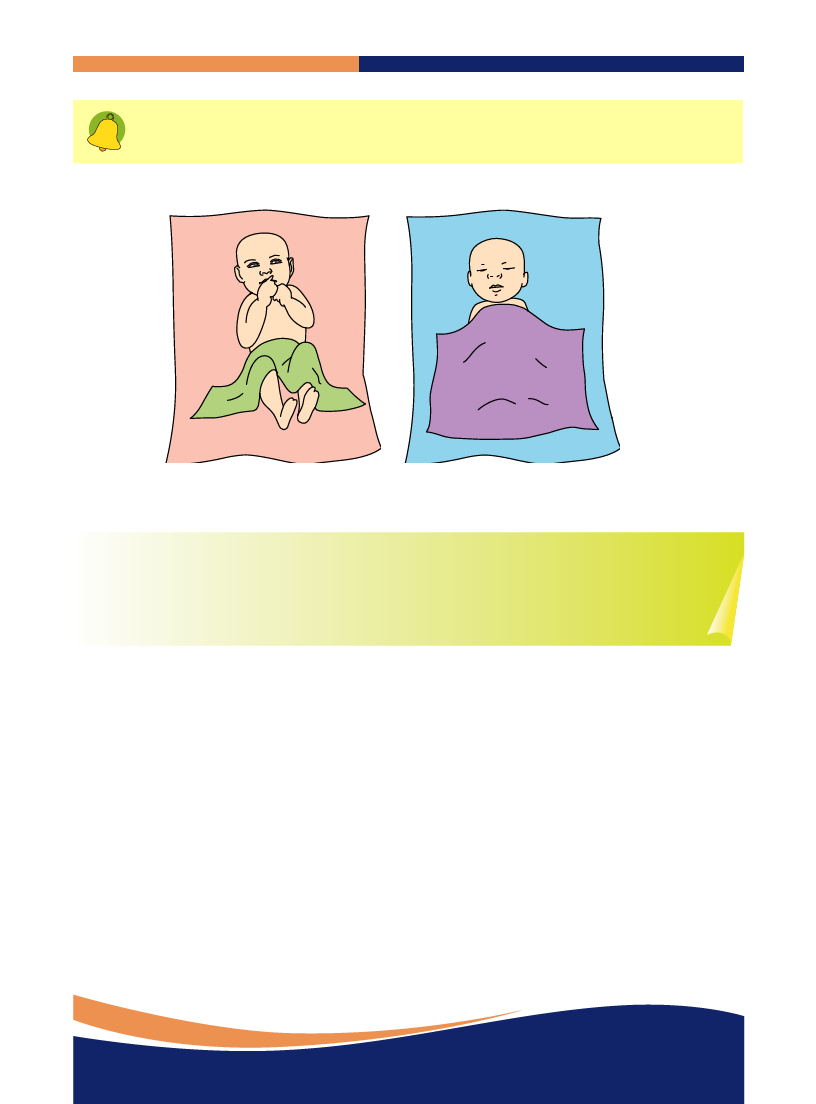
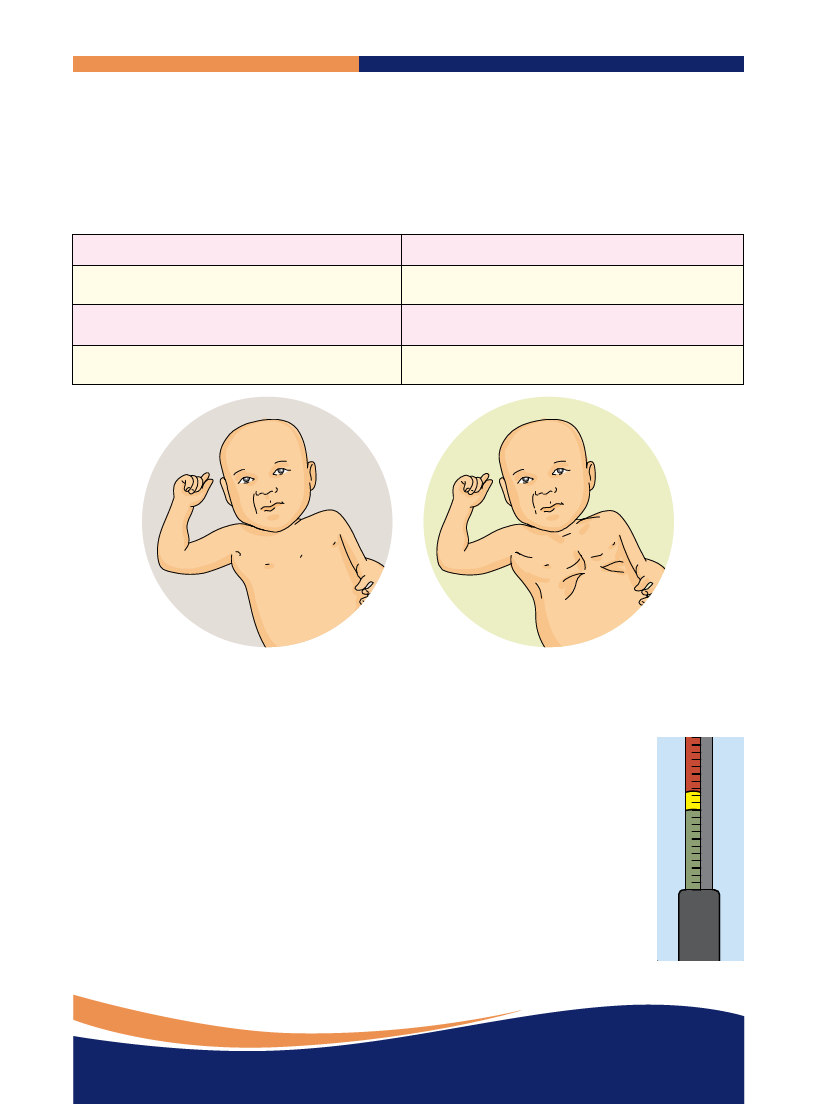
In other words, if the baby remains silent (not crying), does not breath or if there
is no movement, the baby is declared a still birth.
Identification of Live and Still Birth
In the above illustration, first baby is seen with movements, and the second baby is
lying lifeless.
12
Newborn and Child Health Training Module - HUP

2.5 Page 15

▲back to top


Session 2: Essential newborn care/ Care of newborn at the time of birth – Eye
care and Umbilical Cord Care, Cleaning and Wrapping
Objective:
At the end of the session, the HUP link worker/Cluster coordinator will learn to take care of
eyes, umbilical cord and skin of the new born after birth.
Immediate
Eye care
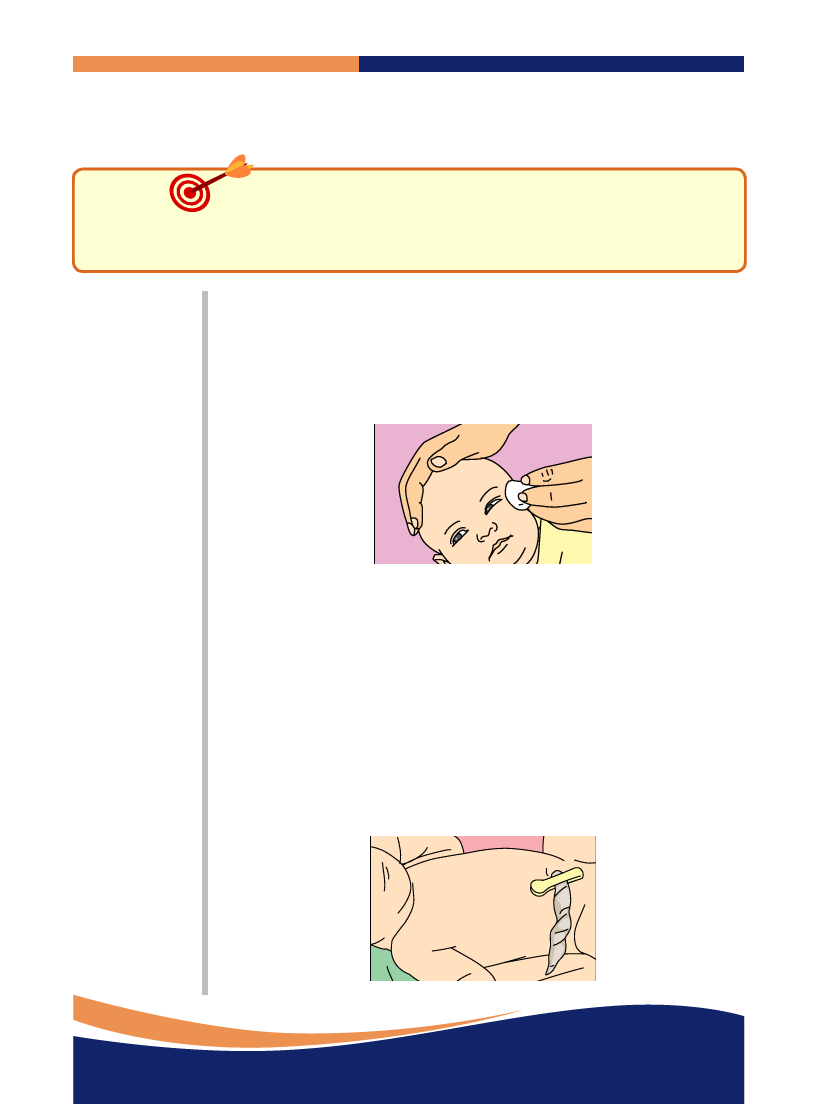
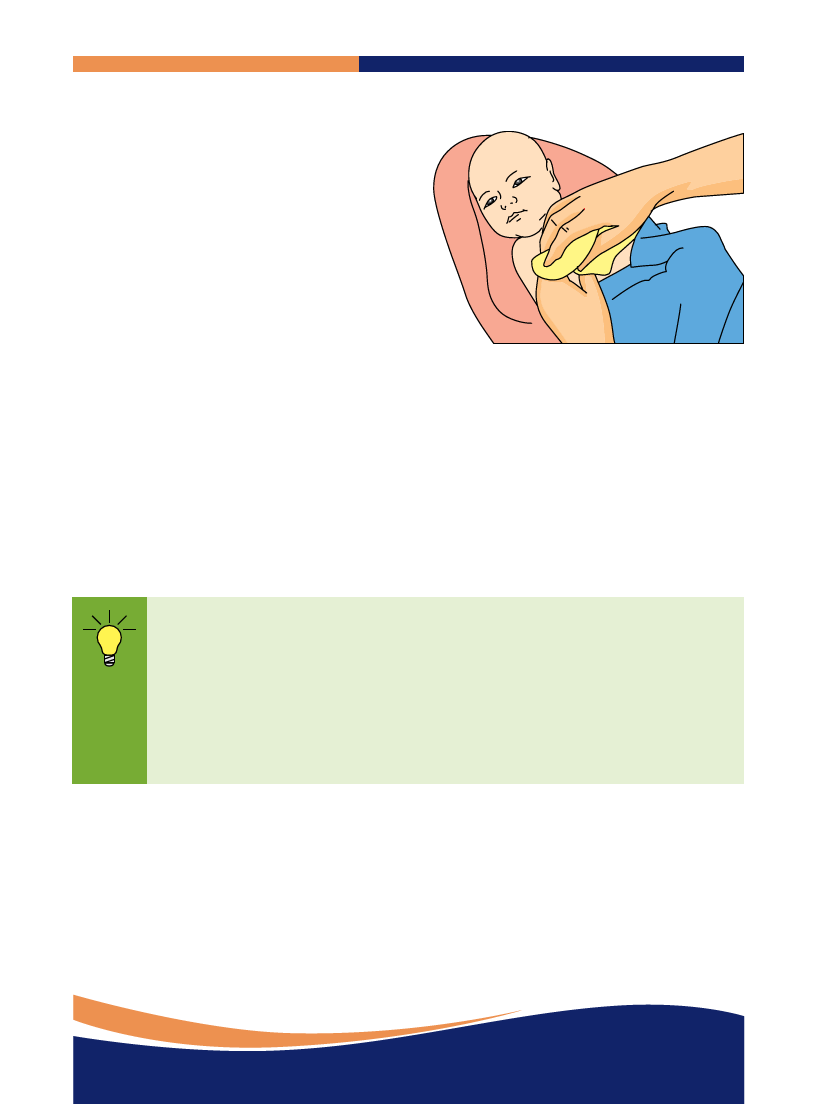
Eye care is given to protect a baby’s eyes from infection. The baby’s eyes must
be wiped as soon as possible after birth - both eyes must be wiped gently with
separate sterile swabs (cotton needs to be boiled for 20 minutes) soaked in
warm sterile water. Wipe from the medial side (inner canthus) to the lateral
side (outer canthus).
Care of
Umbilical Cord
The umbilical cord must be clamped after 1 to 3 minutes using a sterile,
disposable clamp or a sterile tie and cut using a sterile blade about 2 cm
(1 inch) away from the skin. The cord will naturally fall off, as it dries.
No application of any medicine or traditional remedies are required, if there is
no bleeding or discharge. In case there is any bleeding or discharge, the baby
must be referred to the nearest health facility at the earliest. The umbilical
cord needs to be kept clean and dry at all times. Applying traditional remedies
to the cord may cause infections.
13
Newborn and Child Health Training Module - HUP

2.6 Page 16

▲back to top


Cleaning
and
Wrapping
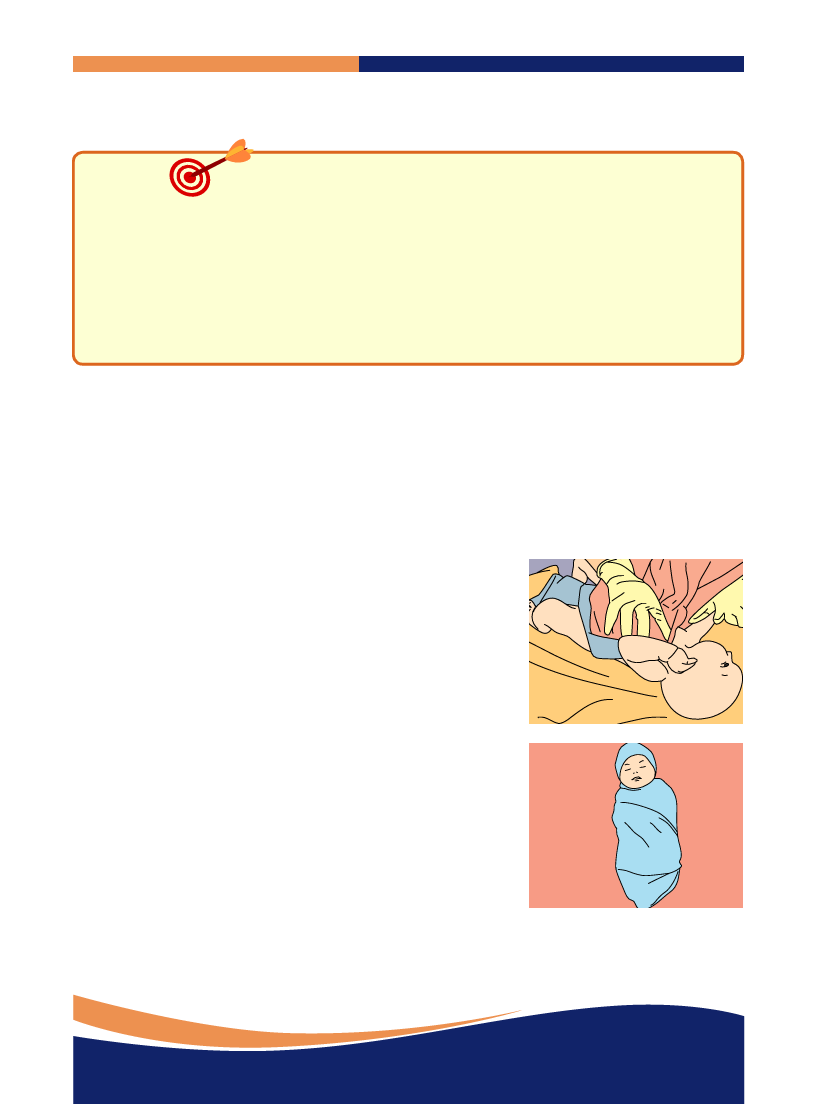
Immediately after delivery, the newborn must be cleaned with a soft dry cloth
and then the body and the head wiped dry with the same. The soft white
substance with which the newborn is covered is actually protective and must
not be rubbed off. Keep the baby clean and dry.
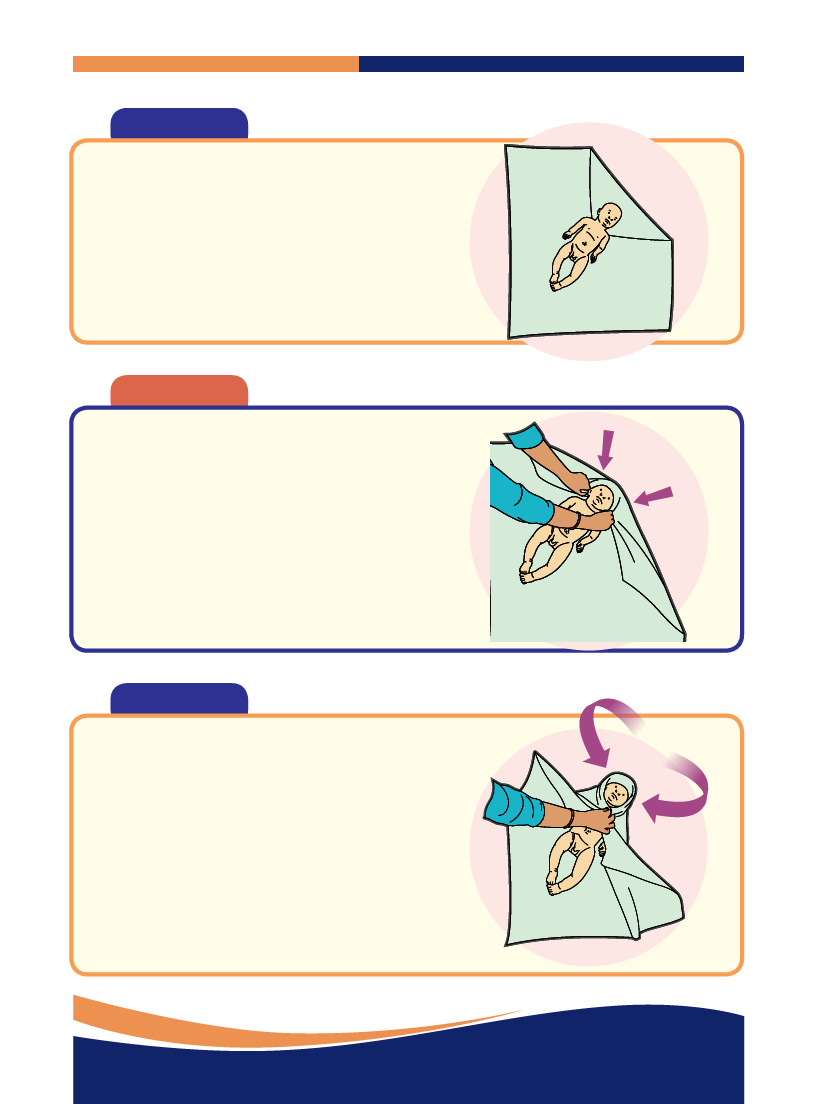
The procedure of baby wrapping has been demonstrated below:
The demonstration throughout the process has been performed on a mattress.
In reality, the activity is better if performed on the cot or a table to avoid the
baby catching cold. One important thing which must be added here is that
the wrapping must not be too tight (prohibiting the baby in limb movements,
where the baby feels uncomfortable) at the same, it must not be loose enough
to allow the temperature loss from the baby’s body.
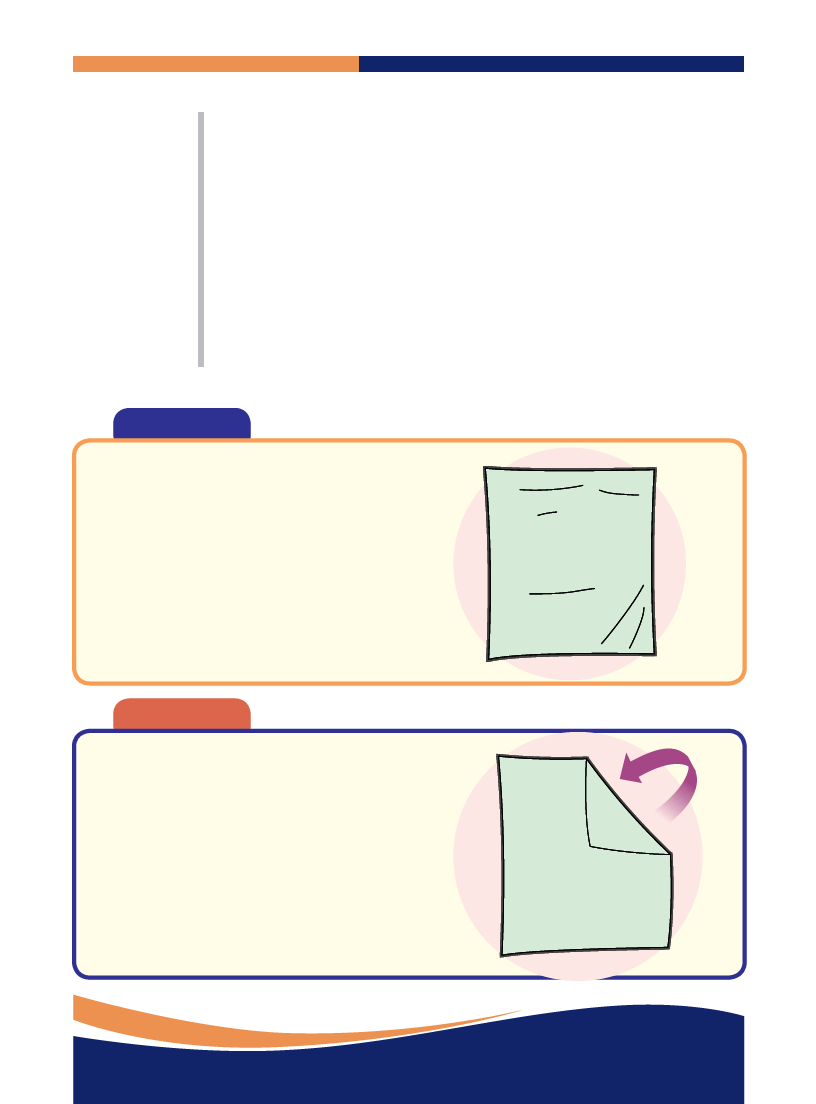
Step 1
First of all, a clean cotton cloth measuring
(2ft/2ft) is taken. The cloth must be
boiled in water for 20 minutes, wrenched
and sun dried before using.
Step 2
In this figure, one of the corners of the
cloth has been folded in a triangular
fashion. After folding one end, the cloth
looks like this. You can compare with the
previous figure for better understanding.
Here, one thing must be added that the
piece of cloth preferable be of rectangular
or square in shape.
14
Newborn and Child Health Training Module - HUP

2.7 Page 17

▲back to top


Step 3
Subsequent to the second step, the baby is
placed on the cloth. If we look minutely, we will
see that the head of the baby is positioned on
the middle folded portion of the cloth.
Step 4
At first hand, the head of the baby is covered
with the extended triangular tip of the cloth.
The underlying causes for that, head is the
surface from where a new born looses the
body temperature more quickly than any other
parts. The cloth not only covers the head but if
we look carefully into the picture, we will see
that like a skull cap it has been used to cover
the forehead and the two ears also.
Step 5
The development or change in this figure can be
better located if we go back to picture 4. There
the portion of cloth, which has been marked
with two arrows, has been folded to cover the
head and ears of the baby just like a safety
helmet as demonstrated in picture 5. Only the
eyes, nose and mouth of the baby will be visible
after this step.
15
Newborn and Child Health Training Module - HUP

2.8 Page 18

▲back to top


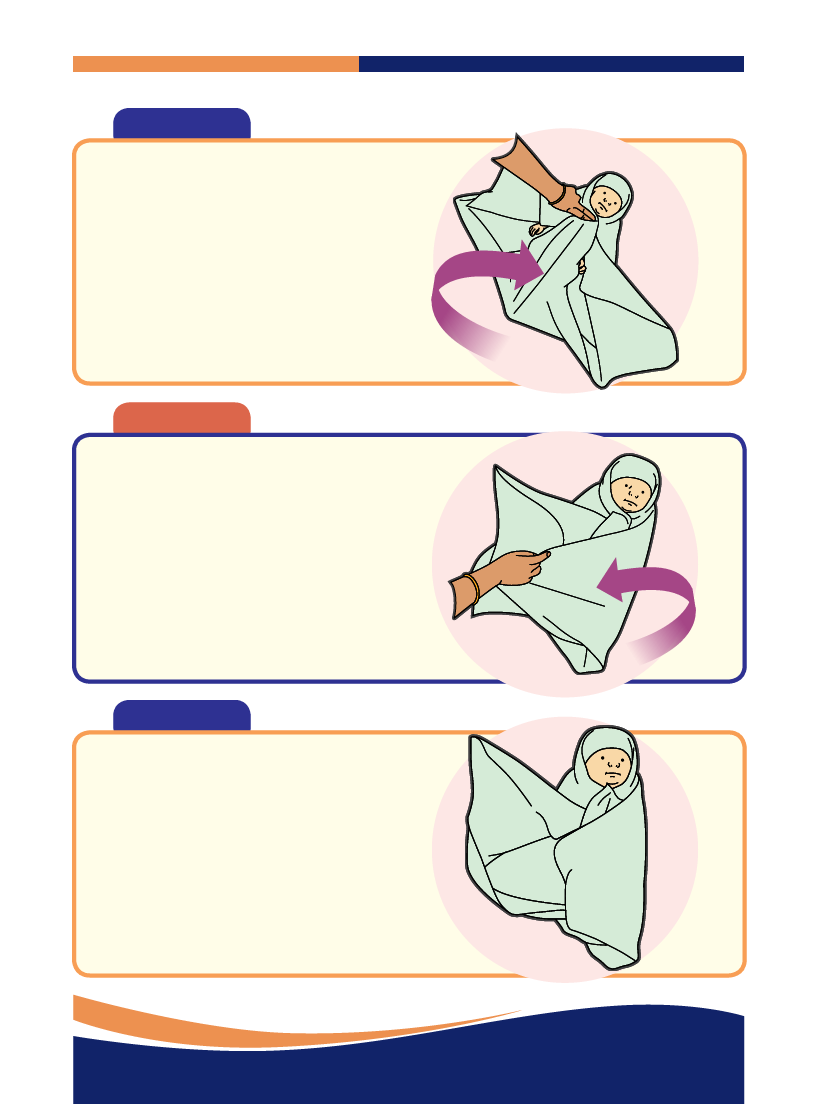
Step 6
After securing head of the baby, comes
the care of feet. It is also a vulnerable
part of the body, which must be taken
care of subsequently. The arrow here
shows how the cloth has been extended
to the neck. This step not only secures
the baby’s feet but also acts as a robe for
the baby. The picture can be compared
with the previous one for clear idea.
Step 7
Here, the right wing of the cloth has been
procured to the left part horizontally.
Step 8
The portion of the cloth which was
extended to the left side horizontally
now has been tucked under the baby’s
right arm and backside. This secures the
wrapping from getting loose of open.
16
Newborn and Child Health Training Module - HUP

2.9 Page 19

▲back to top


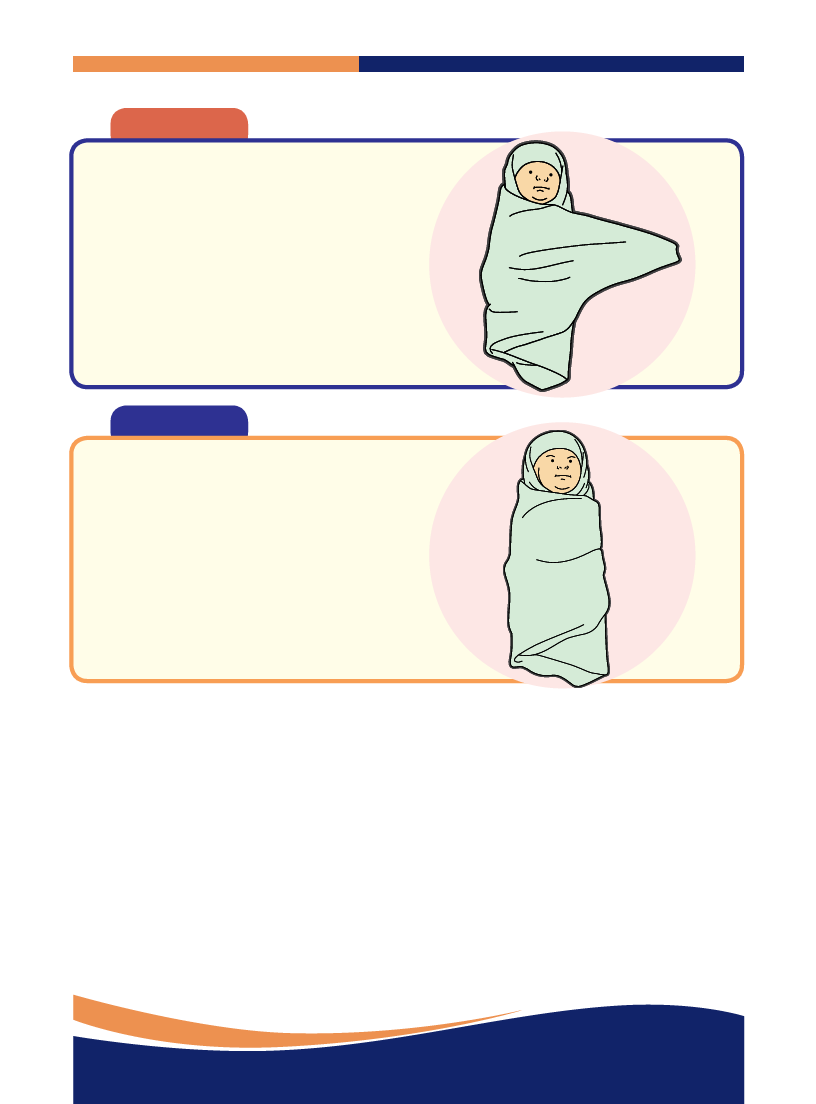
Step 9
Like the steps undertaken in picture 7,
the extended portion of the left winged
cloth is now horizontally pitched up to
the right hand side.
Step 10
This is end of our exercise, in other words,
it is the desired outcome of the effort we
have put forth in all nine steps. The baby
here is securely wrapped in a cloth and
looks more of a cocoon where only, the
eyes, nose, mouth and chin are visible.
17
Newborn and Child Health Training Module - HUP

2.10 Page 20

▲back to top


Session 3: First Examination of the New born- What all to see- Temperature,
Breathing and Weighing
Objective:
At the end of the session, the HUP link worker/Cluster coordinator will be able to:
l Identify the newborn whose body temperature is less than normal or more than normal
l Identify if the newborn has in drawing of chest
l Explain the importance of weighing a baby for monitoring growth
l Using hand-held scale to weigh newborns
l Indicators of normal, low birth and high risk babies
Assessing baby’s temperature
Body Temperature In
Fahrenheit (°F)
97.0°F - 98.6°F
95.0°F to 97.0°F
Less than 95.0°F
Inference
Normal body temperature of a new born
New born catching cold
Hypothermia
When and why, the newborns get cold?
Most newborns lose heat in the first minutes after delivery. They are born wet. If they are left wet and
naked, they lose a lot of heat. A newborn baby’s skin is very thin and its head is big in size compared
to its body thus loses heat very quickly. Babies do not have the capacity to keep themselves warm. If
the newborn baby is not properly dried, wrapped and the head not kept covered, the temperature
will fall 2 to 4 degrees within 10-20 minutes.
(Hypothermia and Hyperthermia in newborn has been later discussed in session IV : Keeping the
newborn warm)
18
Newborn and Child Health Training Module - HUP

3 Pages 21-30

▲back to top


3.1 Page 21

▲back to top


Assess the baby’s breathing
The baby’s breathing must be assessed while drying:
l Watch the way the baby’s chest raises and falls
l Count the breaths in one minute
Age
0 to 59 days
Fast breathing count
60 breaths per minute or more
2 months up to 12 months
50 breaths per minute or more
12 months up to 5 years
40 breaths per minute or more
If the baby was born at home and has 60 breaths per minute or more, then it needs to be
referred to the First Referral Unit as soon as possible.
Learn how to weigh the new born
l Baby should be weighed within two days of birth (48 hrs)
l It is important to weigh the baby after birth because babies may require special
care on the basis of the birth weight
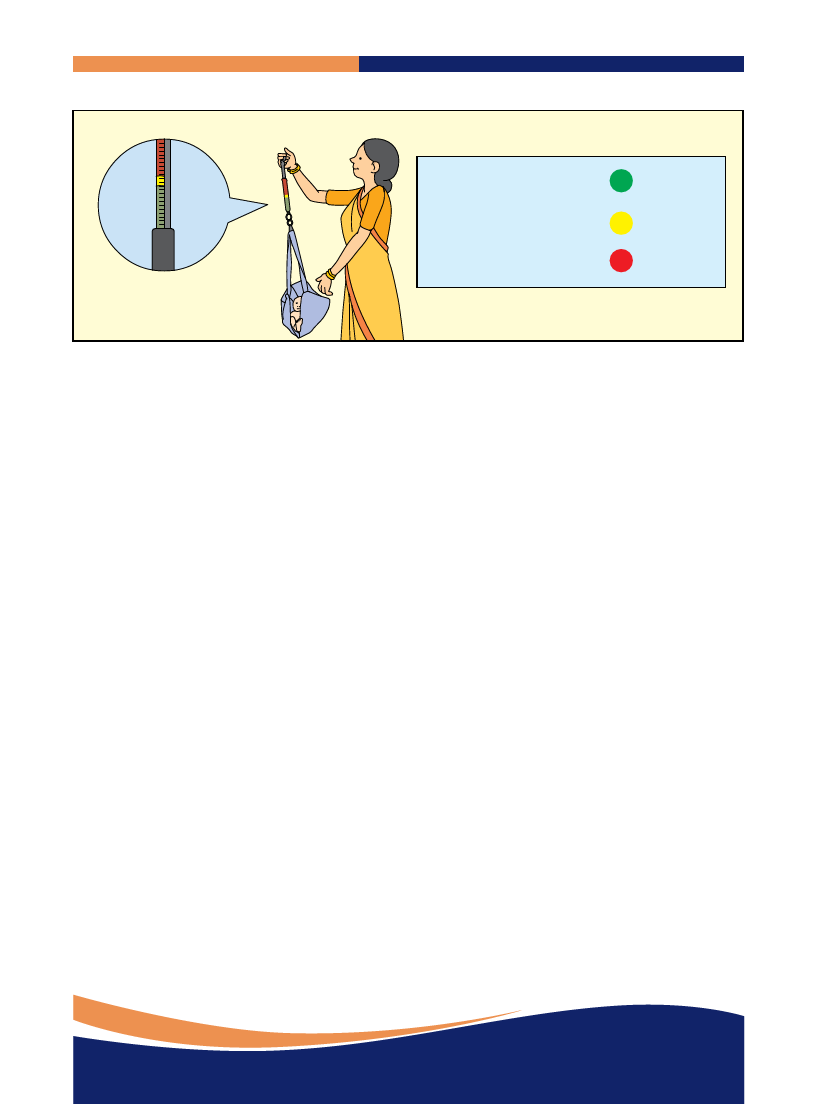
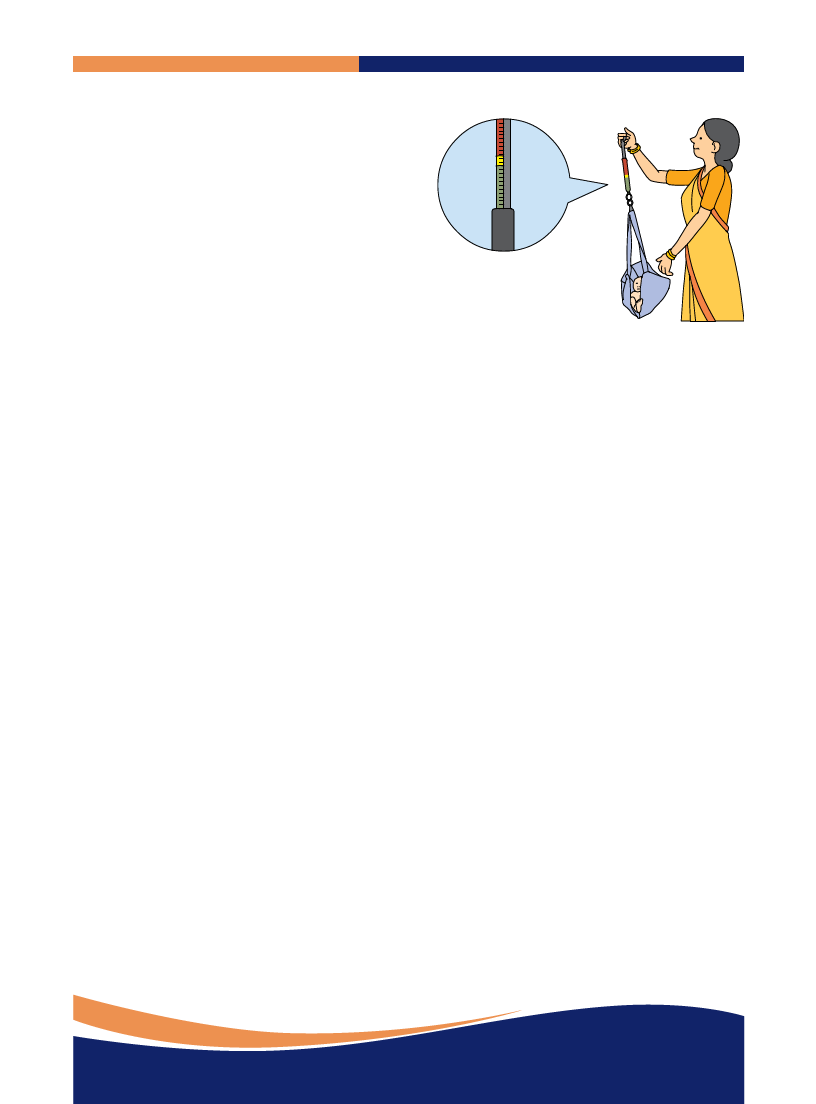
l It is better to use a special colour-coded weighing machine meant just for
weighing newborn which records the weight as green, yellow or red.
19
Newborn and Child Health Training Module - HUP

3.2 Page 22

▲back to top


2.5 Kg or more
Between 1.8 kg to 2.5 kg
1.8 kg or less
Normal
LBW
Very LBW
Taking care of Low Birth Weight/Mildly Under Weight Babies
Babies whose weight is in the yellow or red zone are LBW and require extra care as follows:
l Provide extra warmth
l Family needs to ensure:
m Baby is well wrapped with soft cotton clothes and blankets
m The head is covered to prevent heat loss
m The baby is kept very close to the mother’s abdomen and chest
m Warm water filled bottles wrapped in cloth may be kept on either side of the baby’s
blankets, when mother is not close to the baby
m The baby must be fed more frequently
All babies below 1.8 kg must be taken to a new born care unit (if available) or other health
facility nearby.
The most preterm babies (babies born on 8 months and 14 days of pregnancy or before) are low
birth weight (LBW) but some babies at full gestation are also LBW. LBW at full gestation can be
caused by:
l Mother who is short in height and is under weight
l Mother eating less quantity of food and/or not eating nutritious food during pregnancy
l Mother having an illness
l Mother has anemia
l Mother works too hard during pregnancy
l Absence of adequate rest
20
Newborn and Child Health Training Module - HUP

3.3 Page 23

▲back to top


Session 4: Keeping the Newborn Warm
Objective:
At the end of the session, the HUP link worker/Cluster coordinator will learn about:
1. Identification of the newborn whose body temperature is less than normal and whose
body temperature is more than normal.
2. How to take the temperature.
3. Helping mothers to keep the newborns warm.
4. Teaching mothers how to control newborn temperature in hot or cold weather.
Keeping newborns warm and the problem of hypothermia
Keeping the baby warm at birth is a priority. After the birth, the baby must be dried with a clean and
warm towel. After drying, the wet towels or clothes should be replaced and the baby must be again
loosely wrapped in clean, dry and warm towels.
Why it is necessary to dry and remove wet cloth?
l After birth the baby remains wet with amniotic fluid
which if not dried immediately can lead to heat loss.
l This heat loss may result in rapid decrease of newborn’s
body temperature.
l Babies have difficulty maintaining their temperature at
birth and in the first days of life, unlike adults if they get
cold, they lose energy, and can become sick.
l Low birth weight and pre term babies are at greater risk
of catching cold.
l Drying itself often provides sufficient stimulation for
breathing to start in mildly depressed newborn babies.
21
Newborn and Child Health Training Module - HUP

3.4 Page 24

▲back to top


Hypothermia
When a baby has a temperature below normal, it suffers from hypothermia and the body temperature
ranges between 95°F to < 95°F.
Hazards of hypothermia
A baby suffering from hypothermia has:
l Decreased ability to suckle at the breast, leading to poor feeding and weakness
l Increased susceptibility to infections
l Increased risk of death, especially in cases of low birth weight and preterm babies
How can HUP link worker/Cluster coordinator assess if a baby is hypothermic?
l The early sign is cold feet
l By measuring the baby’s body temperature the situation can be analyzed
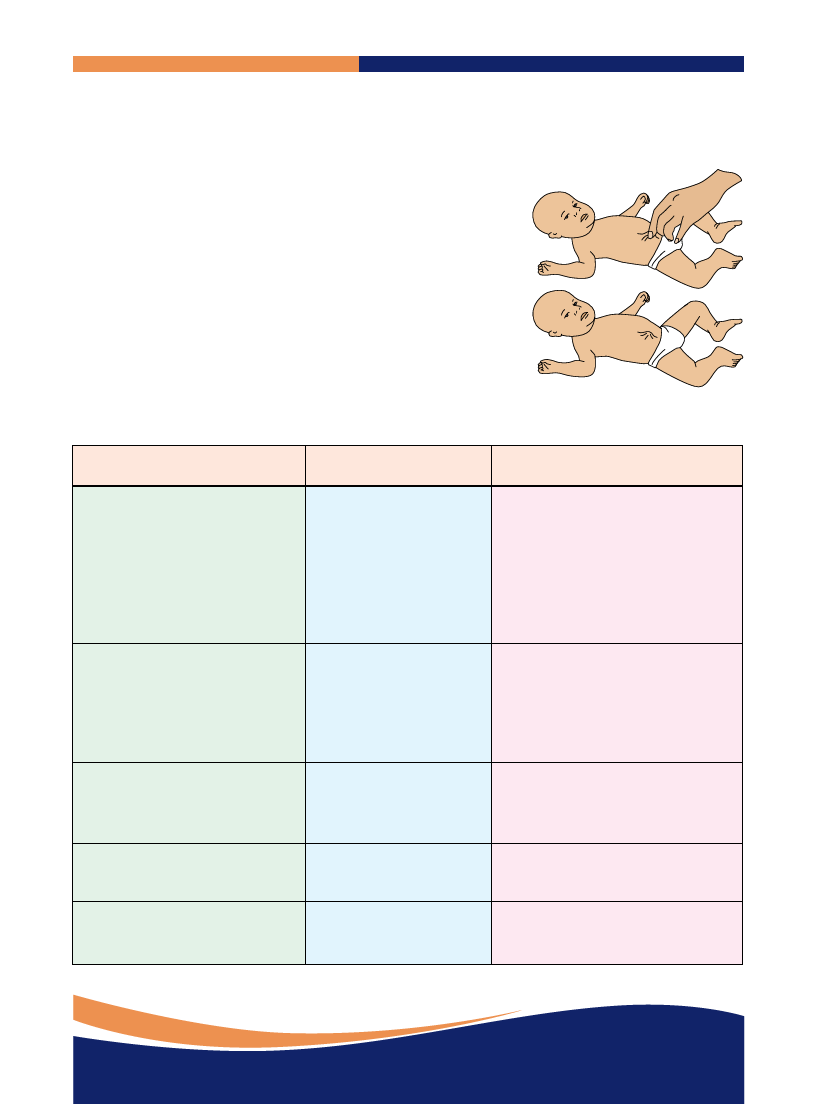
l If the baby’s limbs are picked up and released, it drops down lifelessly.
Ways of keeping the baby warm:
1. Before delivery warm up the room (warm enough for the adults)
2. Before delivery, make sure there adequate clean soft clothes to wipe the baby and another
quilt, to loosely wrap the baby in
3. Initiating breastfeeding as soon as possible ensures a good milk supply and helps the baby
maintain its temperature. The nutrients in colostrum provide energy the baby requires to
generate body heat
4. Place in skin to skin contact with the mother and cover or put clothes on the baby, wrap it up
with a clean cloth, and place it close to its mother
5. Covering the head of the baby with a cap, especially in winter months and rainy seasons, can
save a lot of heat leaving from the baby’s head
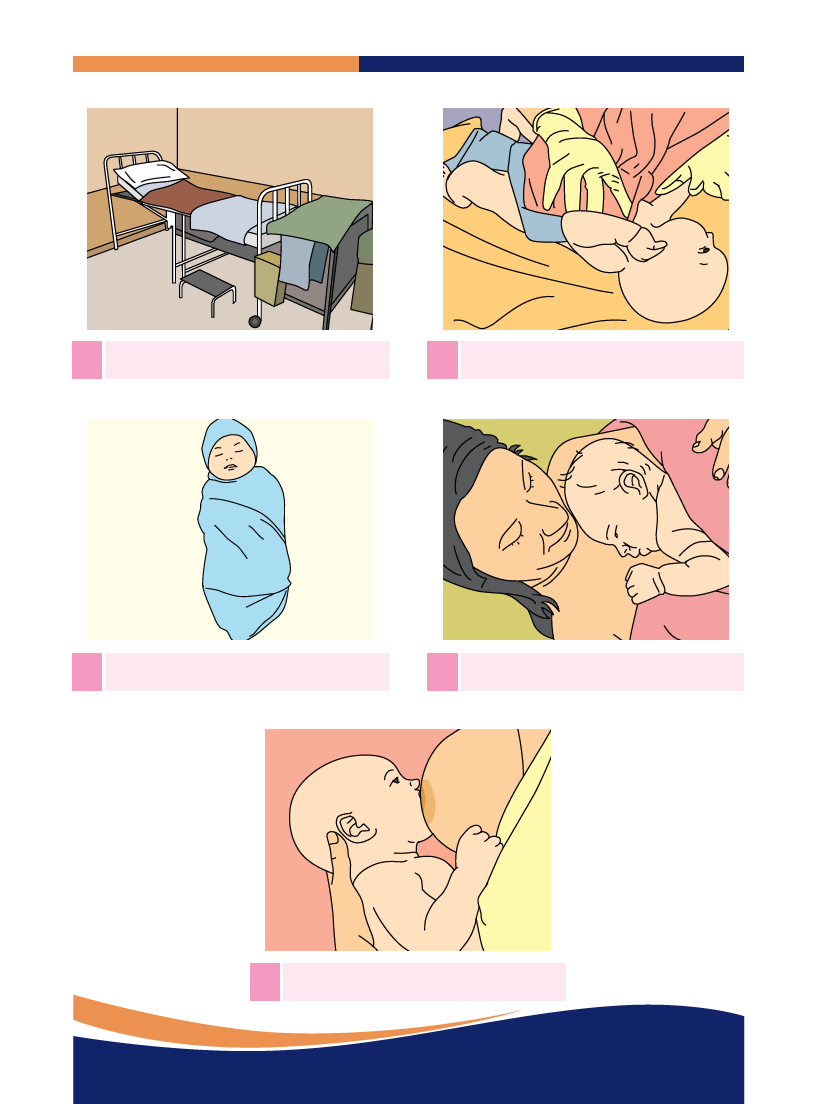
6. For maintaining the temperature, it is important to understand the concept of “Warm chain”.
It means that the temperature maintenance should be a continuous process starting from the
time of delivery and continued till the baby is discharged from the hospital. The components of
warm chain are summarized below:
22
Newborn and Child Health Training Module - HUP

3.5 Page 25

▲back to top


1 Delivery Room
2 Drying baby immediately after birth
3 Wrapping the baby with clean cloth
4 Skin-to-skin contact with mother
5 Early initiation of breast feeding
23
Newborn and Child Health Training Module - HUP

3.6 Page 26

▲back to top


Remind trainees: Hypothermia can also be a sign of infection; it is hence important to
also check for signs of infection. The baby must be re-warmed. If hypothermia persists
and if the baby has loose limbs, the baby may have an infection
‘Warm chain’
(0 to 7 days)
At delivery:
l Ensure the delivery room is warm (25° C), with no
draughts
l Dry the baby immediately; remove the wet cloth
l Wrap the baby with clean dry cloth
l Keep the baby close to the mother (ideally skin-to-skin) to
stimulate early breastfeeding
After delivery:
l Keep the baby clothed and wrapped with the head
covered
l Keep the baby close to the mother
l Use kangaroo care for stable LBW and stable/normal
babies
Bathing for (normal/low birth weight/pre term) newborns:
It is best to wait until the umbilical cord of the baby dries and fall off. For small and preterm babies,
do not give a bath until the baby gains weight (this could be few weeks) and gradually increases at
least to 2,000 grams.
How to re-warm a baby getting cold (<97°F or too cold <95°F)
l Increase the room temperature.
l Remove any wet or cold blankets and clothes.
l Hold the baby with the body next to mother’s skin (skin to skin contact) and place a warmed
cloth on neck or chest. As this cloth cools down, replace it with another warmed one, and repeat
until the baby is warmer. Continue until the baby’s temperature reaches the normal range.
l Continue to breastfeed the baby.
24
Newborn and Child Health Training Module - HUP

3.7 Page 27

▲back to top


Definition of KANGAROO MOTHER CARE (KMC)
Kangaroo Mother Care (KMC) is a special way of caring for the low birth weight (LBW) babies. It
improves their health and well being by promoting effective thermal control, breastfeeding, infec-
tion prevention, and bonding. In KMC, the baby is continuously kept in skin-to-skin contact with the
mother and breastfed exclusively. KMC is initiated in the hospital and is continued at home.
There are two components in KMC:
a. Skin-to-skin Contact:
Early, continuous and prolonged skin-to-
skin contact between the mother and her
baby is the basic component of KMC. The
infant is placed on her mother’s chest
between the breasts.
b. Exclusive Breastfeeding:
The baby on KMC is breastfed exclu-
sively. Skin-to-skin contact promotes
lactation and thus facilitates exclusive
breastfeeding.
25
Newborn and Child Health Training Module - HUP

3.8 Page 28

▲back to top


Session 5: Breast feeding
Objective:
At the end of the session, the HUP link worker/Cluster coordinator will be able to understand:
1. Importance of colostrum feeding and exclusive breast feeding (EBF) for the first 6
months
2. Importance of continuing breast milk along with complementary feeding
The exceptional nutritional quality of human milk has been recognized for a long time. Mother’s
milk is easy to digest and assimilate.
Nutritive Value of Human Milk
1. Protein in mother’s milk is in a more soluble and easily absorbable.
2. The milk sugar – lactose in mother’s milk provides ready energy.
3. In addition, a part of it is converted into lactic acid in the intestines which destroys
harmful bacteria present there and helps in absorption of calcium and other
minerals.
4. The vitamins, such as thiamine, vitamin A and vitamin C found in mother’s milk
(depends on the diet of the mother) are available in reasonable quantity.
Some of the advantages of breast milk are:
a) Always clean.
b) Protects the baby from diseases due to the presence of antibodies.
c) Makes the child more intelligent.
d) Available 24 hours a day and requires no special preparation.
e) Develops special bonding between mother and baby.
f) Helps in birth spacing between children.
g) Helps a mother to recover from different physical ailments like shedding extra weight gained
during pregnancy.
Early Initiation of Breastfeeding: Provide colostrum immediately after birth, preferably
within 30 minutes.
26
Newborn and Child Health Training Module - HUP

3.9 Page 29

▲back to top


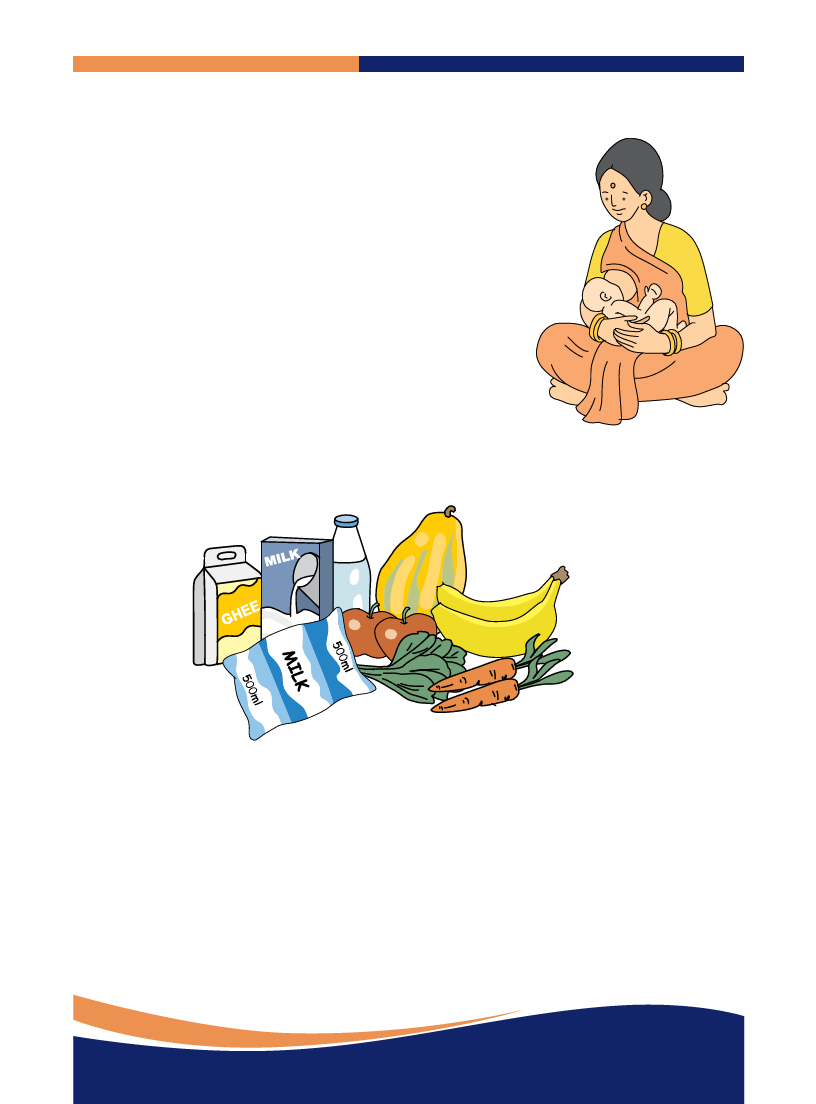
Colostrum and its advantages:
l Colostrum is the very first immunization of a child.
l It is yellowish in colour and sticky. It is highly nutritious and
contains anti-infective substances.
l It is very rich in vitamin A and protein content.
l Helps in building stores of nutrients and anti-infective
substances (antibodies) in the baby’s body.
l These antibodies substances protect the baby from infectious diseases.
Late initiation of breastfeeding causes:
1. Deprives the child from colostrum.
2. Leads to introduction of pre-lacteal feeds like glucose water,
honey, ghutti, animal milk or powdered milk which are harmful
and often contribute to diarrhoea.
3. Causes engorgement of breasts which hampers successful
lactation.
No pre lacteal feed like glucose water, honey, ghutti, animal milk
or powdered milk are recommended as benefits of breastfeeding
are reduced if it is not exclusive.
Hence, proper counseling is required for the mothers, family members and educating communities
on the following issues:
1. Early initiation of breast feeding including colostrum feeding
2. No pre lacteal feeds
3. Exclusive breast feeding for the first six months
4. Breast Care for mothers.
Exclusive breastfeeding (EBF)
Exclusive breastfeeding means that babies are given only breast milk and nothing else – no other
milk, food, drinks and not even water. During the first six months exclusive breastfeeding must be
practiced, it provides best and complete nourishment to the baby during the first six months. Breast
milk alone is adequate to meet the hydration requirements even under the extremely hot and dry
summer conditions.
27
Newborn and Child Health Training Module - HUP

3.10 Page 30

▲back to top


It is important to ensure exclusive breastfeeding of all babies as it saves babies from diarrhea and
pneumonia. It also helps in reducing risk of attacks of asthma and allergies.
Correct position for breastfeeding
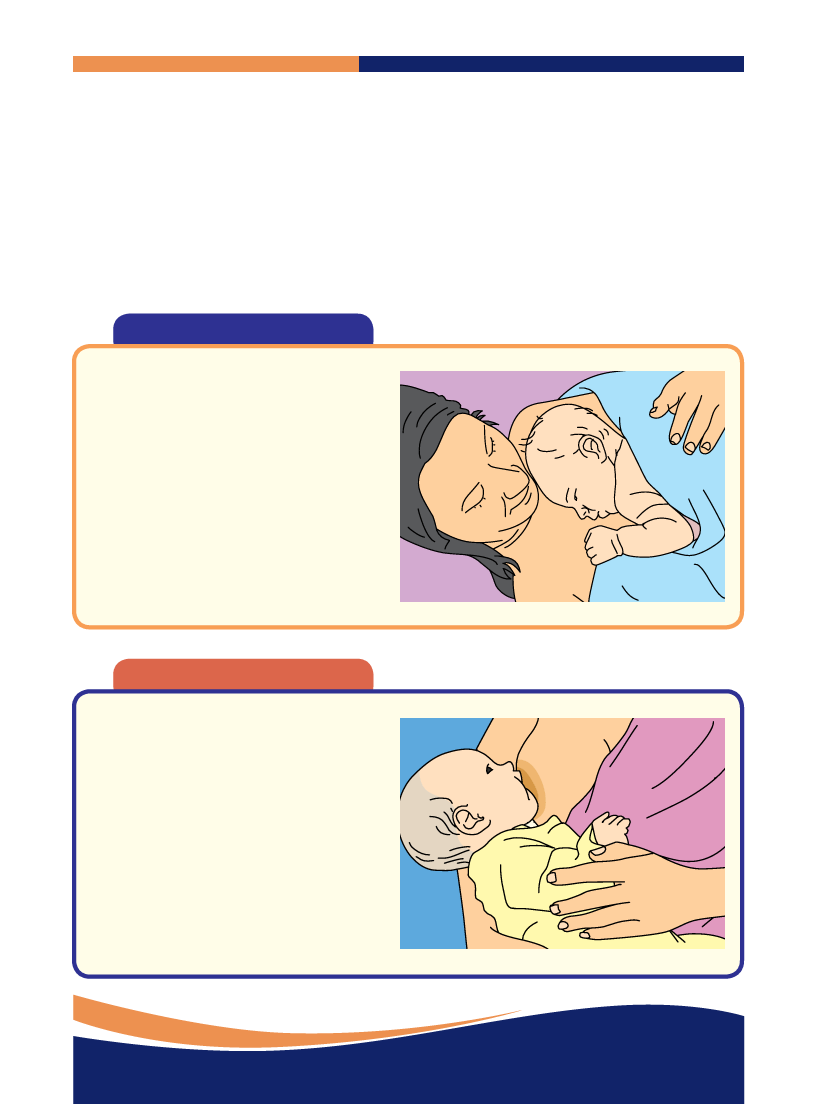
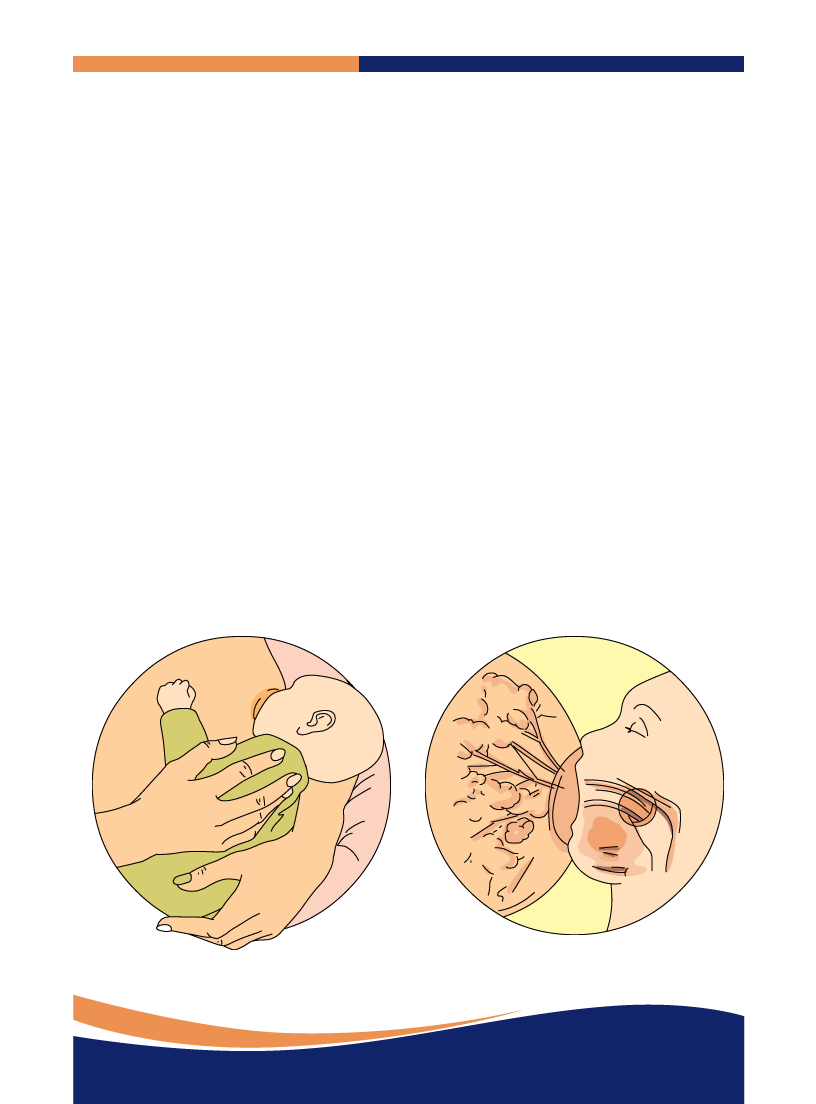
To obtain maximum benefit of breastfeeding, the baby needs to be held in the correct position and
be put correctly to the breast as follows:
(a) While holding the baby, the mother also supports the baby’s bottom, and not just the head or
shoulders.
(b) Mother holds the baby close to her body.
(c) The baby’s face is facing the breast, with nose opposite the nipple.
(d) The areola is inside the baby’s mouth and only slight upper tip of areola is visible.
(e) The baby’s lips should be touching the mother’s breast.
(f) The lips of the baby will be in circular mode.
28
Newborn and Child Health Training Module - HUP

4 Pages 31-40

▲back to top


4.1 Page 31

▲back to top


Continued breastfeeding as supplementary food
Breastfeeding must be continued up to the age of two years
or beyond. Continuing breastfeeding while giving adequate
complementary foods to the baby provides all the benefits of
breastfeeding to the baby. In other words, the child gets energy,
high quality protein, vitamin A, anti-infective properties and other
nutrients besides achieving emotional satisfaction, needed for
optimum development of the child. Breastfeeding especially at
night ensures sustained lactation.
In the beginning, when the complementary foods are introduced
after six months of age, the food should be fed when the infant is
hungry. As the child starts taking complementary foods well, the
child must be given breastfeeding first and then the complementary
food. This will ensure adequate lactation.
29
Newborn and Child Health Training Module - HUP

4.2 Page 32

▲back to top


Session 6: Schedule of Home Visits for care of the Newborn
Objective:
At the end of the session, the HUP link worker/Cluster coordinator will be able to:
1. Know the day and purpose of home visit
2. Activities to be carried out in each visit
3. Acquire the skill to counsel the mother and family members for exclusive breast feeding
and other important issues of newborn care
Schedule of home visit:
The purpose of the home visit is to ensure that the newborn is being kept warm and breastfed
exclusively. Encourage the mother to breastfeed; discourage harmful practices such as bottle
feeds, early baths, giving other foods and to identify early signs of sepsis or other illnesses in the
newborn.
Thus, the following schedule needs to be maintained for the new born:
l The newborn requires a visit immediately after birth (or within the first 24 hours), and on Day
2 especially in case of home delivery.
l Visits must be done on the 3rd, 7th, 14th, 21st and 28th day of the birth of the baby.
l Additional visits are required for newborn babies who are LBW, pre term and sick.
Schedule of Home Visit
Days
Day 3
Actions
History taking of the child: For identifying the danger signs
Refer immediately to the Nearest Health Facility
Examining:
a. Body parts for any abnormality
b. Rate of Breathing per minute
c. Baby’s colour
d. Temperature
e. Umbilical Cord
f. Infection (skin)
g. Convulsions
h. Eyes and stimulus
30
Newborn and Child Health Training Module - HUP

4.3 Page 33

▲back to top


Refer immediately to the nearest health facility in case of any complications.
Counseling on:
a. Immunization
b. Maintaining hygiene while handling the baby
c. Not applying anything on the umbilical cord
d. Wrapping baby properly
e. Exclusive breastfeeding for first six months and no other feed
f. Delaying the bath of baby for at least 7 days
Day 7,
14, 21
and 28
History taking:
a. If the baby is breast feeding properly
b. Any other problem/complication
c. Change in weight (loss/gain)
d. If the baby has been bathed
e. If the baby has been given anything else apart from breast milk as per traditional
practice or myths
Examining:
a. Rate of Breathing per minute
b. Baby’s colour
c. Temperature for fever
d. Umbilical Cord (is it swollen/any discharge)
e. Convulsions
f. Diarrhea
g. Eyes
h. Response to sound and voice
Refer immediately to the nearest health facility in case of any complication.
Counseling on:
a. Exclusive breast feeding for the first six months
b. Maintaining hygiene while handling the baby
c. Not applying anything on the umbilical cord
d. Wrapping baby properly
e. Identifying danger signs and referral to the nearest health facility
31
Newborn and Child Health Training Module - HUP

4.4 Page 34

▲back to top


Day 42 History taking:
a. If the baby has received all the vaccines recommended so far
b. If the baby is breastfeeding properly
c. The weight gained by the baby
d. If the baby is suffering from any problem
Examination:
a. Baby’s weight
b. Baby’s action-lethargic/normal
Counseling:
a. Importance of exclusive breastfeeding for first sixth months and its continuation
till the 2nd year
b. Importance of complete immunization
c. Detection of danger signs like convulsions, high fever, blood in stool etc. and im-
mediately taking the baby to nearest health facility
32
Newborn and Child Health Training Module - HUP

4.5 Page 35

▲back to top


Session 7: Immunization Schedule
Objective:
At the end of the session, the HUP link worker/Cluster coordinator will learn about:
l Beneficiary tracking: listing the names and knowing the due list for the next dose
l Ensuring that the child’s immunization record is updated
l Children who are at risk of being excluded from the program and how to ensure complete
coverage
Role of HUP link worker/Cluster coordinator in
Immunization
l Make a list of pregnant women, newborns and children
up to 9-12 months of age for immunization till measles
vaccine
l Ensure that immunization is discussed during every
home visit where there is a child under one year of
age
l Remind mother when the immunization is due and
alert her about the date
l If needed, escort the mother and baby to the health
facility on the date when the vaccine is due. This is
important for families who do not access services
such as those from poor, marginalized and remote
communities
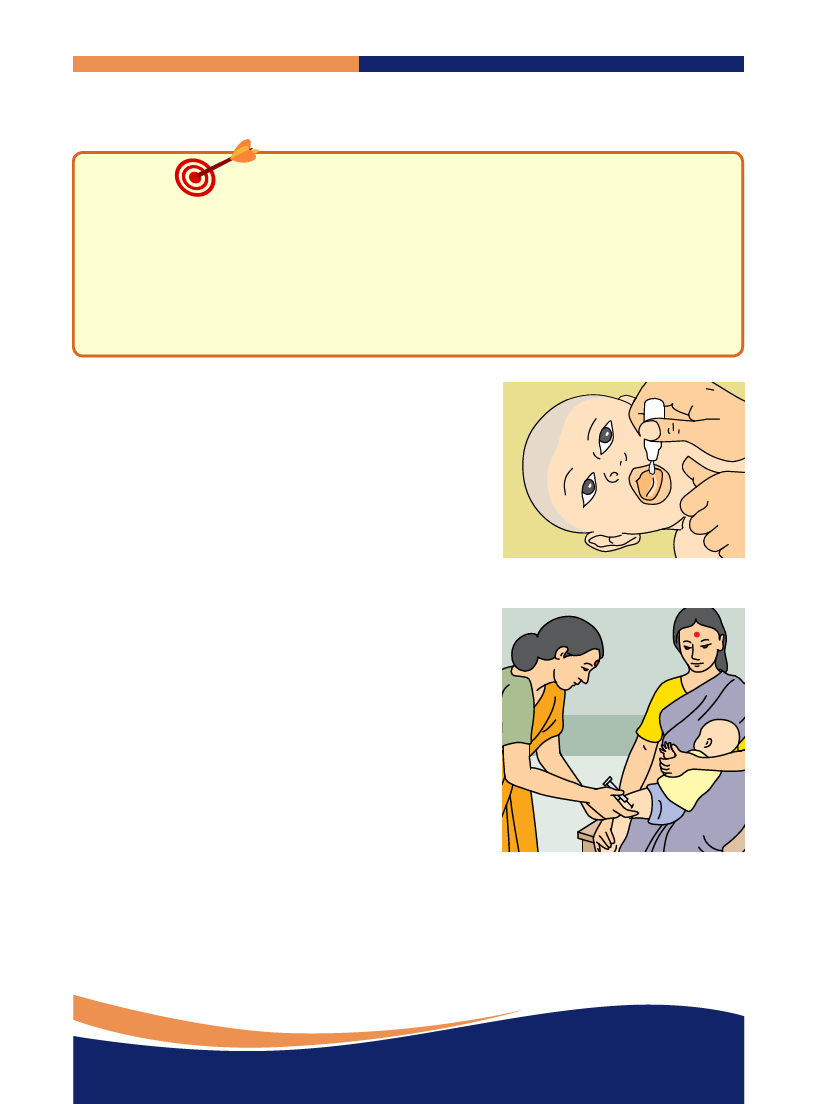
l Ensure that BCG , zero dose of oral polio and Hepatitis
B is given soon after the baby is born
l Ensure that poorest and most distant households
(underserved/unserved) receive special attention to
access the service
33
Newborn and Child Health Training Module - HUP

4.6 Page 36

▲back to top


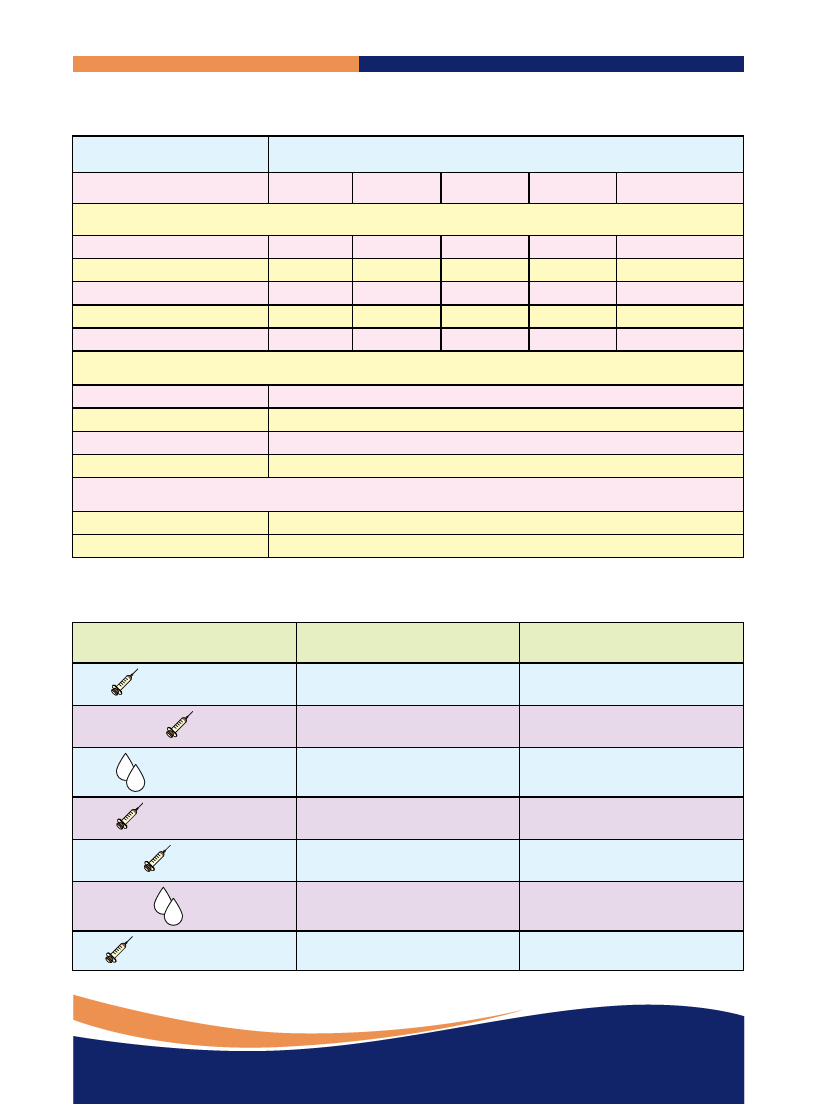
National Immunization Schedule:
Vaccine
Primary vaccination
BCG
Oral Polio
DPT
Hepatitis B
Measles
Booster Doses
DPT + Oral Polio
DPT
Tetanus toxoid (TT)
Vitamin A
Pregnant women
TT: 1st dose
TT 2nd dose
Birth
Age
6 weeks 10 weeks 14 weeks 9-12 Months
ü
ü
ü
ü
ü
ü
ü
ü
ü
ü
ü
ü
16 to 24 months
5 years
At 10 years and again at 16 years
9, 18, 24, 30, 36, 42, 48, 54 and 60 months
As early as possible during pregnancy (first contact)
1 month after 1st dose
Common Vaccines- Their Dose and Site:
Vaccine
Dose
Site
BCG
Hepatitis B
OPV
DPT
Measles
Vitamin A
TT
0.1ml
(0.05ml until 1 month of age)
0.5 ml
2 drops (0.5 ml)
Left Upper Arm
Antero-lateral
side of mid-thigh
Oral
0.5 ml
0.5 ml
1st dose – 1 lakh IU
2nd-9th dose – 2 lakh IU
0.5 ml
Antero-lateral
side of mid thigh
Right upper Arm
Oral
Upper Arm
34
Newborn and Child Health Training Module - HUP

4.7 Page 37

▲back to top


Common Side effects of Vaccination
Most side effects from vaccines are limited to tenderness and swelling or pain where the injection
was given or a fever. Children usually recover from these minor side effects within a day or two. Most
of these minor side effects happen in the first day or two after immunization. However, in case of
serious cases, the child or infant must be rushed to the nearest health facility.
Sl. No.
Name of vaccination
1. Hepatitis B
2. Polio
Common side effects
• Diarrhea
• Irritability
• Loss of appetite
• Mild fever
• Swelling
• Redness at injection site
• Weakness
• Irritability
• Loss of appetite
• Vomiting
3. BCG
4. DPT
5. Measles
6. Tetanus Toxoid
• Diarrhea
• Loss of appetite
• Nausea
• Stomach pain
• Mild fever
• Soreness at the injection site
• Irritability
• Vomiting
• Drowsiness.
• Burning or stinging at the injection site
• Diarrhea
• Dizziness
• Irritability
• Mild fever
• Diarrhea
• Headache
• Mild fever or chills
• Minor pain
• Swelling or redness at the injection site
35
Newborn and Child Health Training Module - HUP

4.8 Page 38

▲back to top


General Instructions (When Vaccines should not be given to a child):
Sl. No.
Name of Vaccine
1 Tetanus Toxoid (TT)
When not to give
a) Suffering from fever
b) Outbreak of Polio in the locality
2 Diphtheria Pertussis Tetanus (DPT) a) Hyper sensitive (allergic reaction) after
1st dose of DPT
b) Any family history of convulsions
3 Hepatitis B
a) Hypersensitivity/Allergic reaction
b) Fever
4 Polio
a) Experiencing diarrhea or viral infection
5 Measles
a) Has untreated TB
b) Suffering from Acute Respiratory Infec-
tion
c) Suffering from any form of cancer, AIDS
or Leukaemia
The neonate/infant can be given vaccination when suffering from common diseases like cough and
cold. However, the child should undergo the course of vaccination upon the guidance and advice of
a Medical Officer.
36
Newborn and Child Health Training Module - HUP

4.9 Page 39

▲back to top


Session 8: High-Risk Assessment and the Management of Low Birth Weight/
Preterm babies
Objective:
At the end of the session, the HUP link worker/Cluster coordinator will be able to:
l Identify babies which are at high risk
l Diagnose and refer high risk children
l Counsel the mother on how to breastfeed a pre-term / Low Birth Weight (LBW) newborn
Using the following table, the LW/CC can decide whether the baby is high risk or not:
Day on which baby is
weighed for the first
time
1 to 14 days
15 to 21 days
22 to 27 days
28th day
Weight of baby
Less than 1.8 kg.
Less than 2 kg. 100 gm.
Less than 2 kg 200 gm.
Less than 2 kg 300 gm.
Diagnosis
High Risk Baby
High Risk Baby
High Risk Baby
High Risk Baby
Guidelines for HUP link worker/Cluster coordinator for identifying a high risk newborn
l Birth weight less than 1800 grams.
l Pre-term (delivery which happens when mother is 8 months and 14 days pregnant or less)
l Baby not taking feed.
Guidance that HUP link worker/Cluster coordinator need to give to the family
l Keep the baby wrapped in clothes (clean, dry and preferably cotton) from the very first day.
l Do not bathe a baby till 7 days at least and as its weight increases to 2000 grams.
l Ensure that mother’s nails are cut and that her hands are washed every time the baby is
breastfed.
l After returning from the toilet, all family members must wash their hands with soap before
touching the baby.
l High risk babies should be breastfed after every two hours.
l If baby is not sucking milk, motivating the mother to contact ANM/MO for guidance or counseling
on correct procedure of expressing breast milk.
l The weight of high risk babies needs to improve each week from the second week. If this does
not happen, counsel the mother and the family members.
37
Newborn and Child Health Training Module - HUP

4.10 Page 40

▲back to top


Ask them to call you immediately if the baby develops any of the following:
All limbs become limp
Stops feeding
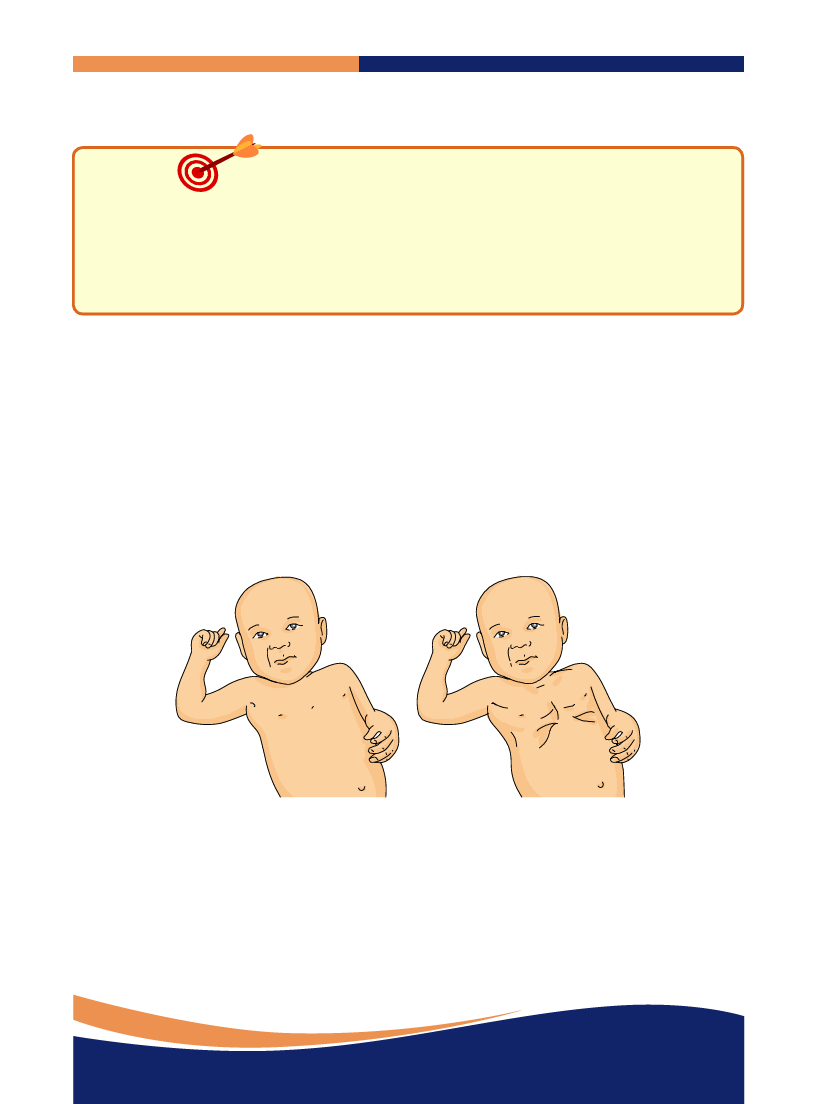
Has chest in drawing
Has fever
What is your role as a HUP link worker/Cluster coordinator if the baby is at high risk?
l Increase the number of home visits after delivery.
l A daily visit, if possible, for the first week.
l Once in every three days until the baby is 28 days old, and if the baby is improving once on the
42nd day.
l Keep a check on the weight of the babies on Day 7, 14, 21, 28 and 42. Babies who weigh less than
2300 gms. on the 28th day have a higher risk of dying. If the baby is not gaining weight, refer the
baby to the nearest health facility.
l Explain the high risk issues to the parents and family .
l Keep the baby warm and breastfeed more often, after every two hours.
l For poor breastfeeding methodology, observe the mother’s breastfeeding posture. Ensure proper
latch on and positioning.
l Encourage the mother so that she is motivated to feed the baby well. Counsel the mother that she
should not give other liquids or feeds.
l If on Day 8 the weight is less than 2300 gms. or weight gain in 28 days is less than 300 gms., then
refer the baby to ANM/MO for further care and management.
38
Newborn and Child Health Training Module - HUP

5 Pages 41-50

▲back to top


5.1 Page 41

▲back to top


Breastfeeding Low Birth Weight/Pre-term babies
Advantages of breast milk for LBW and pre-term Babies
l Has the right nutrients for the pre-term / LBW baby.
l Pre-term babies need more protein and a mother who has
delivered pre-term has more breast milk.
l Breast milk is easily digestible.
l Contains factors to fight infection (small babies are more
vulnerable to disease).
l Breastfeeding keeps the baby close to the mother and
therefore, warm. This protects the pre-term baby from cold
(Hypothermia), which can lead to infection.
Important points to remember:
For small babies who can suckle
l Try the underarm hold for more support or the alternate underarm hold.
l If sleeping, wake baby every 2-3 hours for breastfeeding by rubbing a damp
cloth over its face or patting on the sole of the feet.
Babies who are not able to suckle
l Babies less than 1500 grams may not be able to breastfeed in the
beginning.
l Express milk by applying gentle pressure over entire breast and collect milk
in a clean bowl.
l Express milk every 2-3 hours to keep the milk supply up.
l Put baby to breast and allow to lick the nipple, and try to suckle.
l Once the baby is able to suckle, the baby should be put to the breast as often
as possible to stimulate milk production.
l Continue feeding with the spoon as well until the baby is getting milk
requirement fulfillment directly from the breast.
39
Newborn and Child Health Training Module - HUP

5.2 Page 42

▲back to top


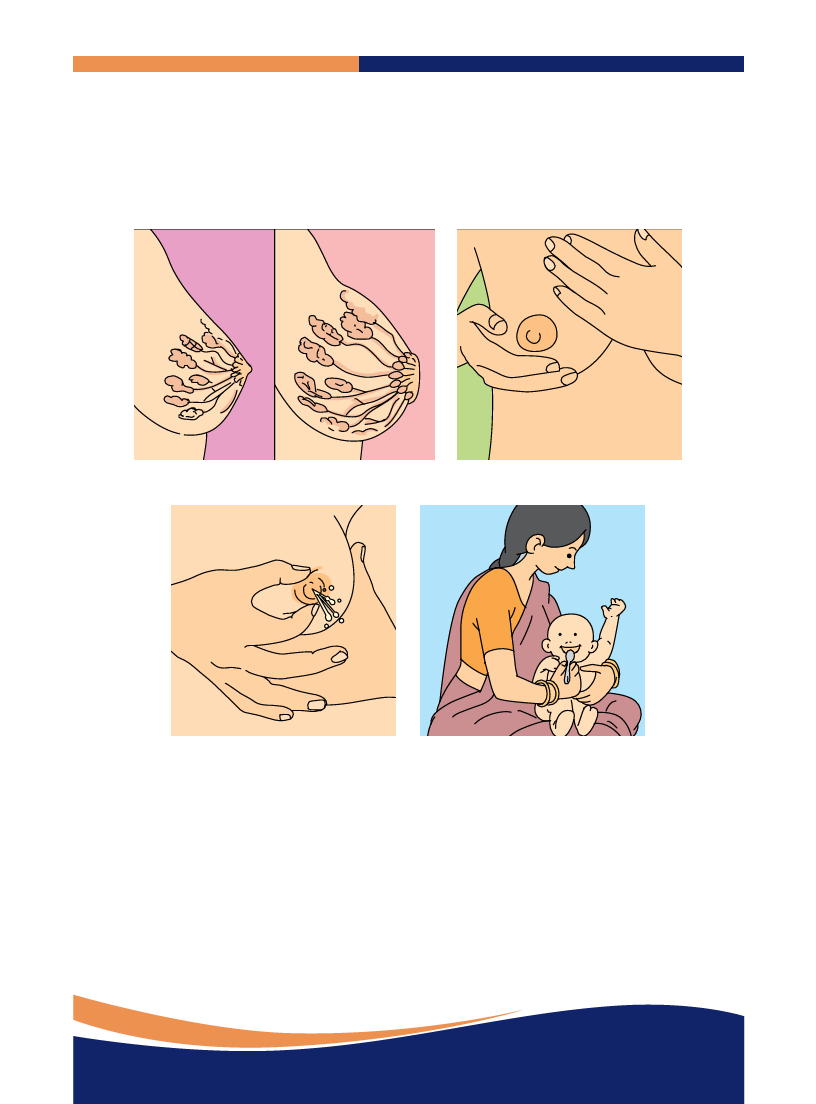
Expressing Breast Milk Procedures
It is a chain of events which should be initiated with breast massaging. At first, apply warm compresses
to the breast and gently massage the breast towards the nipple in a circular direction (clock wise,
both the breasts).
Biological Facet
Massaging the breast
Expressing milk by squeezing
Areola
How much expressed milk to give?
Feed the baby with a clean
spoon
l For a LBW baby: For first day 60 ml/kg body weight.
l Add 20 ml/kg body weight until baby is taking 200 ml per day.
l Divide the total into 8 – 12 feeds (every 2-3 hours).
l Colostrum can be kept for up to 12 hours at room temperature.
l Mature milk (after first 72 hours) can be kept for 6-8 hours at room temperature (Don’t freeze
the milk for a longer duration).
40
Newborn and Child Health Training Module - HUP

5.3 Page 43

▲back to top


Counseling Points
High Risk baby needs extra care:
l Baby needs to stay warm (in cold season).
l Baby should be dried, placed in the warm bag, with a cap on,
and held close to mother.
l Very small babies who are born too early should be placed
between mother’s breasts to stay warm.
l All small babies should breastfeed every two hours.
l Don’t give a bath to the baby until the weight of baby is more
than 2,000 grams.
l Wash hands often, keep nails trimmed, and wash hands before
every breastfeed, after going to toilet and before touching the
baby.
Danger Signs
Call the HUP link worker/Cluster coordinator immediately if
the baby develops any of the following danger signals:
l All limbs become limp
l Stops feeding
l Has chest in-drawing
l Has fever
l Is cold to touch
41
Newborn and Child Health Training Module - HUP

5.4 Page 44

▲back to top


Session 9: Birth Asphyxia
Objectives:
At the end of the session, the HUP link worker/Cluster coordinator will be able to:
1. Define asphyxia
2. Identify babies with asphyxia
3. Describe warnings during delivery that could result in asphyxia
4. List the adverse consequences of asphyxia
Definition of Asphyxia: A baby who has at birth any one of the following symptoms is
asphyxiated:
l No cry
l Weak cry
l No breathing
l Gasping
l Weak breathing
If a baby has asphyxia, the first five minutes after delivery are an emergency. A life can be saved or
lost in these five minutes. If you are present at the time of birth, and there is no doctor or nurse, you
should refer the baby to the 24x7 health facility immediately.
Consequences of Asphyxia (Immediately at birth)
l Baby is born dead (still birth) l Dies at once or within a few days
l Drowsy
l Unable to suckle
Long term
If the baby survives, it may have:
l Mental retardation
l Epilepsy (seizures and fits)
l Spasticity (difficulty walking or moving arms and hands)
Warning signs of asphyxia during labor
1. Prolonged or difficult labor
2. Ruptured membranes with little fluid (dry delivery)
3. Green or yellow colored thick amniotic fluid
4. Cord comes out first or cord is wound tightly around the neck of the baby
5. Pre-term labor (delivery taking place less than 8 months 14 days of pregnancy)
6. Baby being born in a position in which the head does not come out first
Be prepared for Asphyxia during all deliveries, so institutional delivery is
always recommended as birth asphyxia cannot be handled at home.
42
Newborn and Child Health Training Module - HUP

5.5 Page 45

▲back to top


Session 10: Sepsis
Objectives:
At the end of the session, the HUP link worker/Cluster coordinator will be able to:
1. Explain what sepsis is, how it may be caused, and why it is dangerous
2. Diagnose sepsis in newborns
3. Explain how sepsis can be prevented
4. Teach parents and family how to recognize high risk signs
5. Facilitate immediate referral if required
How common is sepsis and how serious?
l The incidence of neonatal sepsis according to the data from National Neonatal Perinatal Database
(NNPD, 2002-03) is 30 per 1000 live births.
l Sepsis in the first month of life is very serious, and is the most common killer of newborns in the
first month of life
l Without treatment, many babies with sepsis will die; with treatment, most babies will get better,
live and grow up normally
“Sepsis” means infection. In newborn babies, “sepsis” refers to any serious
infection in the baby whether in the lungs, brain or blood.
Causes of neonatal sepsis
l Mother has infection during pregnancy or delivery.
l Unclean techniques during delivery (poor hand washing, use of unclean blade or cord ties) can
cause sepsis.
l Cord becomes infected from unclean cutting or applying dirty things on it.
l Baby is weak; born pre-term or is LBW (birth weight less than 2000 gm.).
l Baby becomes weak from poor feeding practices; not giving breast milk early and exclusively.
l Baby becomes weak – exposed to the cold after delivery.
l Baby comes into contact with someone who has an infection: mother, family members or other
care givers.
Can sepsis be prevented? Yes, if the following are observed carefully
l Good hygiene: frequent hand washing; clean instruments during delivery; clean clothes.
l Keeping the baby warm during the cold season.
l Breastfeeding (early initiation and on demand, and exclusive).
l Keeping the umbilical cord clean and dry.
43
Newborn and Child Health Training Module - HUP

5.6 Page 46

▲back to top


Information about danger signs to parents:
HUP link worker/Cluster coordinator should teach the
parents that if any of the following danger signs develop,
then they should be called immediately or the baby should
be taken at once for referral.
l Limbs become limp
l Child stop feeding
l Has chest in drawing
l Has fever
l Is cold to touch
When to refer the baby
1. If the baby has breastfeeding problems that are not being resolved by HUP link
worker/Cluster coordinator’s through counseling and home management after 24
hours then the baby must be referred to the nearest Health Facility.
2. If the baby has developed one/some of the danger signs:
l Not responding to stimulus
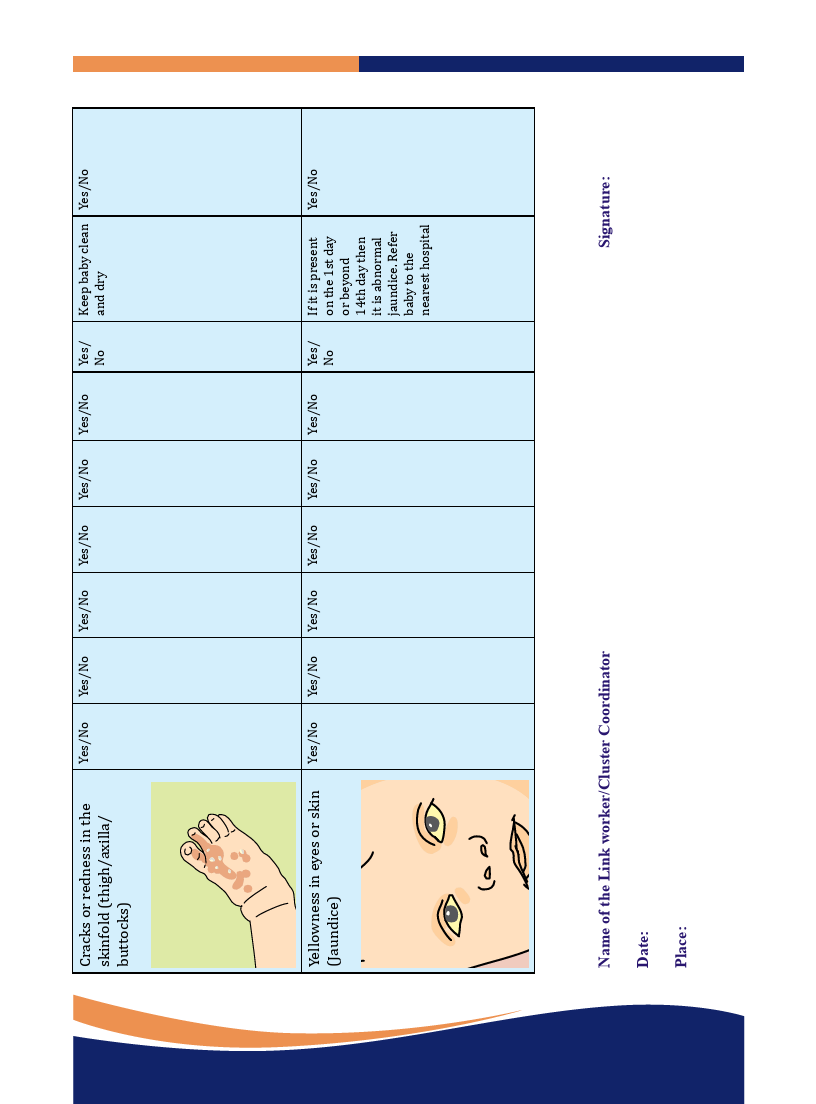
l Becomes yellow (jaundice) on first day or jaundice persists even after 14 days
l Bleeding from nose, mouth or anus
l Convulsions
l Body temperature of baby contiues to remain less that 95° F even after
re-warming the baby for 24 hours
l Tetanus (stiffness after the fourth day), unable to suckle or open mouth
44
Newborn and Child Health Training Module - HUP

5.7 Page 47

▲back to top


PART -B
CHILD HEALTH

5.8 Page 48

▲back to top


Session 11: Assessing the Sick Child
Objective:
At the end of the session, the HUP link worker/Cluster coordinator will be able to:
l Identify general danger signs among sick children
l Recognize symptoms of common illnesses
l Enable prompt referral as and when required
Common illnesses in the young child could include: Diarrhea, ARIs and Fever. Each of these conditions
will be discussed in the coming chapters. However, we need to know about the danger signs in a
child.
What are danger signs?
Danger signs indicate serious illness. These can occur in many illnesses. Some danger signs may occur
without any relationship to the type of illness. For example fever, Diarrhea, pneumonia, meningitis
or malaria can all produce lethargy or unconsciousness. These illnesses can also make the child so
sick that the child is not able to drink any fluids. These are called general danger signs. The presence
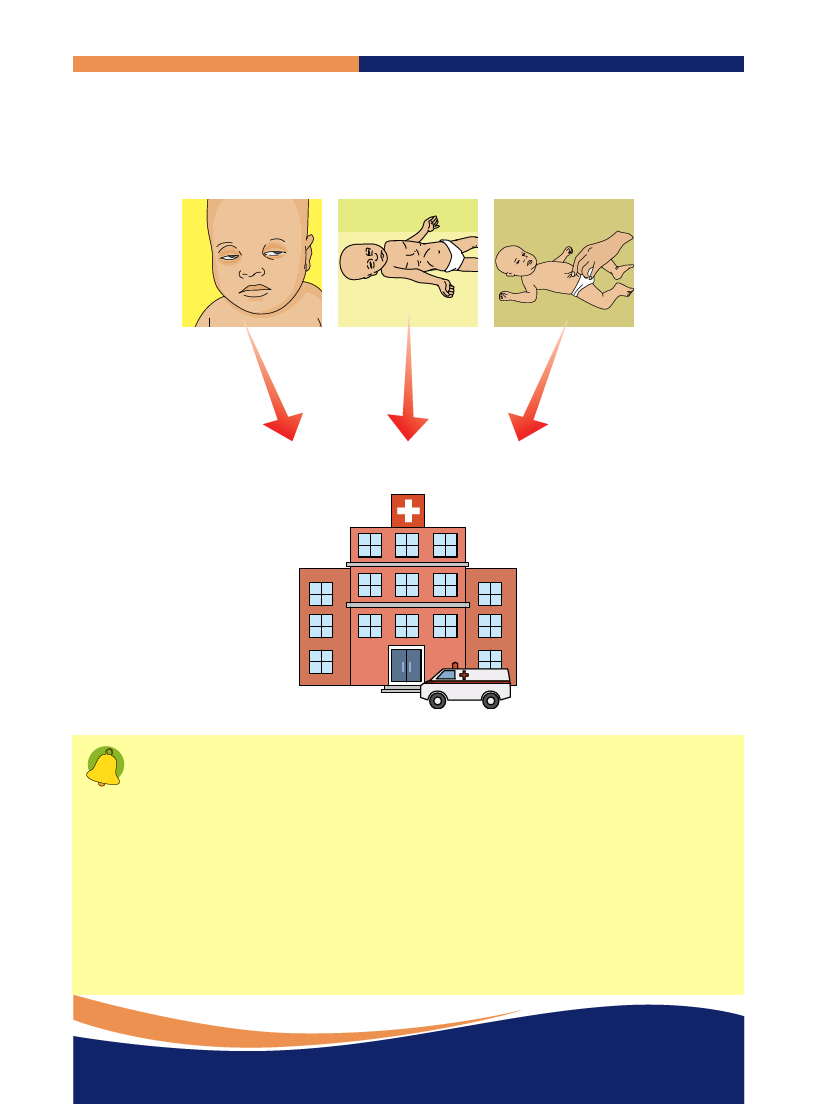
of even one general danger sign is enough to indicate a severe disease.
A danger sign calls for immediate referral. Where signs of common illness like cold and cough,
fever, and Diarrhea are present without any of the danger signs, and where there is no doctor, you
could provide some home-based care to the child and keep a watch for signs that indicate the need
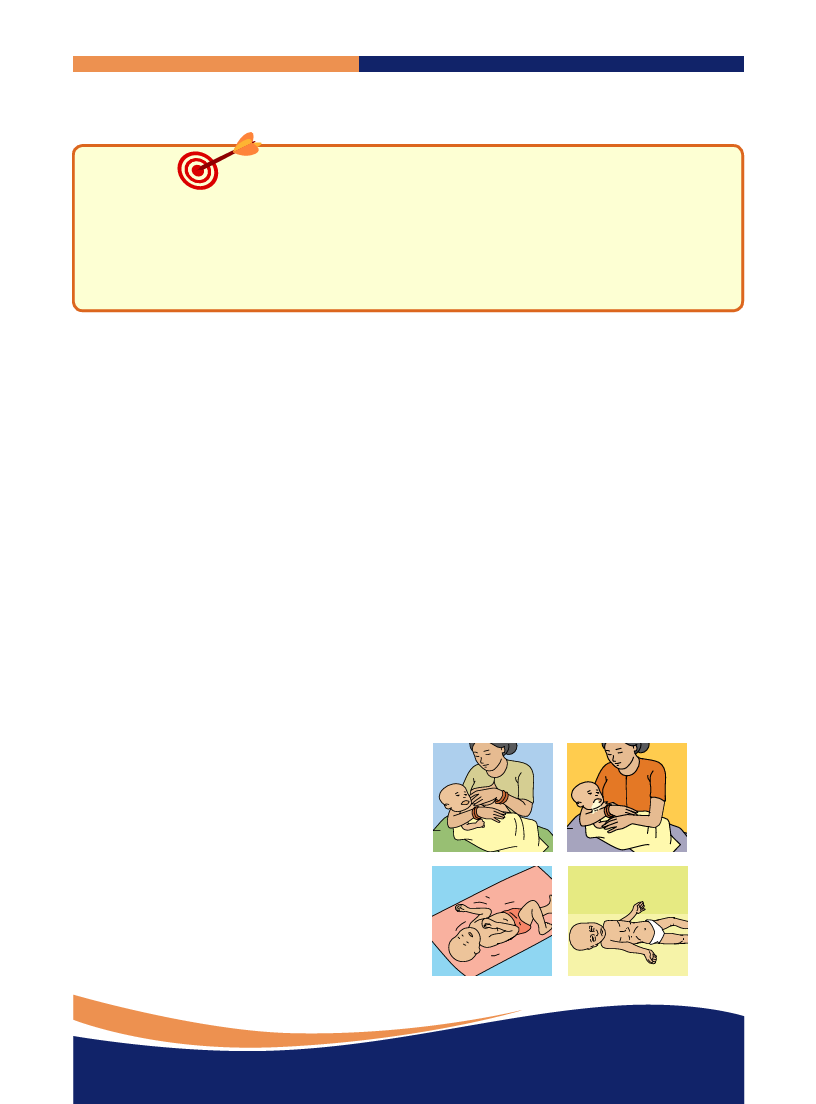
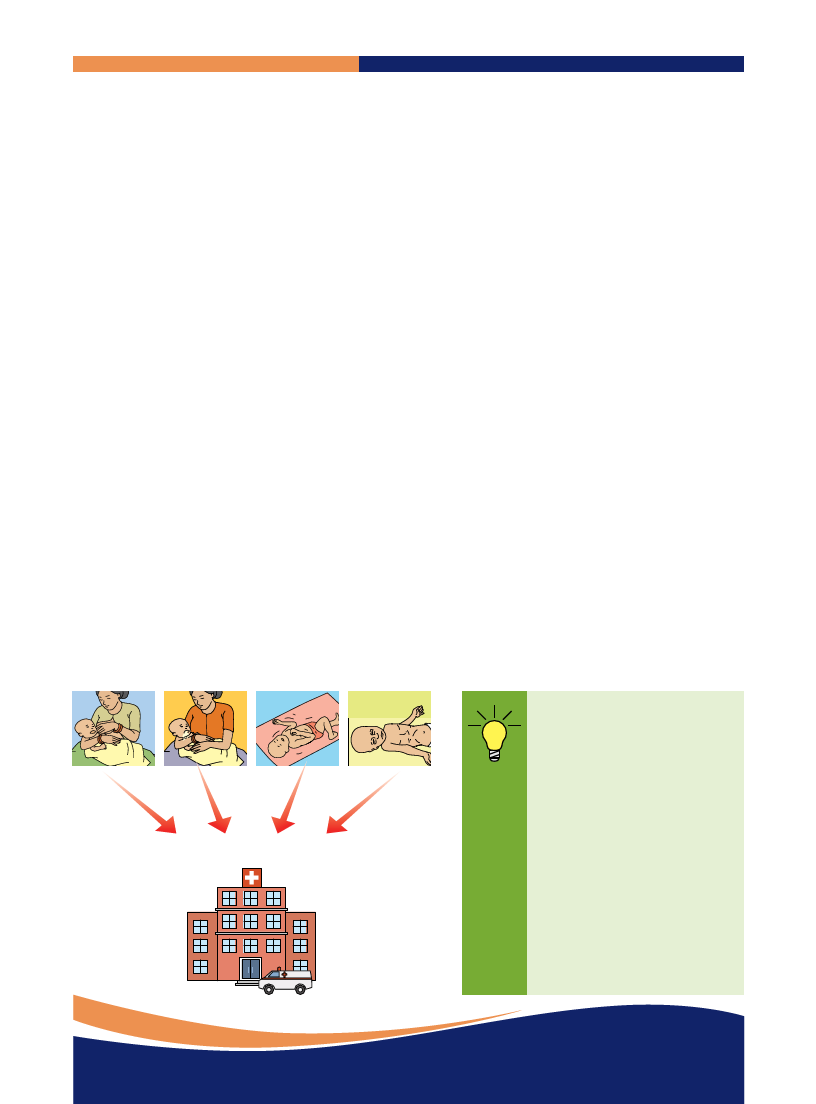
for referral.”
What are the questions a HUP link worker/Cluster coordinator needs to ask when seeing a
Sick Child?
Every child who is seen for an illness should be checked for the presence of the following
general danger signs:
l Not able to drink or breastfeed
l Vomits everything
l Having convulsions
l Is lethargic or unconscious
46
Newborn and Child Health Training Module - HUP

5.9 Page 49

▲back to top


How to assess a sick child for danger signs
Step 1: ASK: Is the child able to drink or breastfeed?
Ask the mother if the child is:
1. Able to suck breast milk
2. Able to swallow, if fed with a spoon
3. If the child is unable to breastfeed, then it may be due to blockage at nose, so check for blockage
at nose
If the child can breastfeed after his nose is cleared, then the child does not have the danger sign.
Step 2: ASK: Does the child vomit everything?
Ask mother if:
1. The baby is vomiting everything, after every meal
2. Retains some fluids and heaves out solid food
3. In second case, the baby has not yet developed any danger sings
Step 3: ASK: Has the child had convulsions?
Ask the mother questions on whether the child has suffered from convulsions (local term)
or not.
Step 4: LOOK: See if the child is lethargic or unconscious.
a) Child who does not respond to any call/touch/noise and does not waken at all, is unconscious
b) Child who stares blankly, sleeps all day or does not notice what is happening around him is
lethargic
Step 5: Ensure that the child is referred to a nearest Health Facility immediately.
Refer Immediately
Remember:
l All sick children must
be assessed for general
danger signs
l A child who has even
one general danger sign
has a severe problem.
Refer this child urgently
to hospital
l Complete the rest of
the assessment and any
pre-referral treatment
immediately so that
referral is not delayed
47
Newborn and Child Health Training Module - HUP

5.10 Page 50

▲back to top


Session 12: Assessing and Classifying Fever
Objective:
At the end of the session, the HUP link worker/Cluster coordinator will be able to:
l Assess the child for fever
l Identify the signs for which urgent referral is required
Fever is a common problem among young children. A child with fever may have malaria or another
disease such as simple cough or cold or other viral infection.
Assessment:
Ask: Does the child have fever?
l Ask the mother if the child has fever.
l To check temperature, place the thermometer in the armpit for 2
minutes.
l If you do not have a thermometer, place your hand on the tummy of
the child to decide if the child feels hot to touch.
Fever is present if the mother is sure that her child has had fever,
measured by the thermometer, or if you have determined that the child
feels hot to touch.
Ask: For how long? Has the fever been present for more than seven
days and every day?
l Ask the mother how long the child has had fever
l If the fever has been present every day for more than seven days,
refer this child for further assessment & subsequent treatment
Look or Feel for Stiff Neck
l While you talk with the mother during the assessment, look to see if the child moves and bends
his neck easily as he looks around. If the child is moving and bending his neck, he does not have
a stiff neck.
l If you did not see any movement, or if you are not sure, draw child’s attention to his umbilicus
or toes. For example, you can shine a flashlight on his toes or umbilicus or tickle his toes to
encourage the child to look down. Look to see if the child can bend his neck when he looks down
at his umbilicus or toes.
48
Newborn and Child Health Training Module - HUP

6 Pages 51-60

▲back to top


6.1 Page 51

▲back to top


A child with fever and stiff neck may have meningitis. A child with meningitis
needs urgent treatment with injectable antibiotics and referral to a hospital.
Table for Classifying Fever
Any general danger sign or
stiff neck
Danger signs :
• Not able to drink or breast-
feed
• Vomits everything
• Has convulsions
• Is lethargic or unconscious
Fever (by history or feels
hot) in malarial area.
Very severe febrile
disease
Malaria
Refer URGENTLY to hospital.
• Refer the child for symptomatic
treatment to the nearest health
facility.
• Advice mother to give extra
fluids, continue feeding
• Advice about danger signs.
Fever Management
Fever is an increase in body temperature and is a natural defense mechanism against germs and
infections; it is generally a symptom of another illness.
Common causes of fever in babies and young children
1. Infection which could be bacterial or viral
2. Over heating especially if left in the sun or heated environment for too long.
3. Over heating from insufficient fluid intake
Signs of fever
1. Forehead and body feels hot to touch
2. Flushed cheeks
3. Irritable, restless and crying
4. Chattering of teeth
5. May refuse to feed
49
Newborn and Child Health Training Module - HUP

6.2 Page 52

▲back to top


Water Sponge during high fever
1. Keep the fan on.
2. Do not use ice or cold water because it may
instigate hypothermia.
3. Take a hanky/Turkish towel.
4. Make it wet and remove excess water.
5. Spread it over the trunk and later tummy of
the baby.
6. Cover maximum surface, it relieves the baby.
7. Keep the hanky/towel till it becomes hot or dries off.
8. Change the hanky/towel, repeat the same till the temperature comes down.
9. In case of forehead sponging, first we have to make the scalp of the baby wet.
10. If after all these steps the temperature of the baby does not come down, then the baby must be
taken to a doctor for further treatment.
Remember:
l Do not assess for fever if the child does not have fever
l If fever has been present every day for seven days or more, refer to hospital
l Remember to classify a child with fever who has a general danger sign as very
severe febrile disease and refer immediately
If fever is high, one can do ‘tepid water sponging’ to lower the fever.
50
Newborn and Child Health Training Module - HUP

6.3 Page 53

▲back to top


Session 13: Assessment and Management of Diarrheal Disease
Objective:
At the end of the session, the HUP link worker/Cluster coordinator will be able to:
l Assess dehydration & ascertain if referral is required
l Preparation & demonstrating ORS use to mother
l Counseling the mother for continued feeding during diarrhea
l Counseling the mother for prevention of diarrhea
Overview
Diarrhea is defined as the passing of loose, liquid or watery stools more than 3 times a day. Diarrhea is
most common in children between 6 months to 2 years, being highest during 6-11 months. Diarrhea
leads to dehydration and malnutrition in a child.
Step 1: Identifying nature of Diarrhea
l Duration: Ask the mother if her child has Diarrhea. If the mother says that her child has Diarrhea,
ask for how long the child has Diarrhea.
l If Diarrhea is of 14 or more days of duration this is severe persistent Diarrhea and the child
should be referred to a health facility.
l Passing blood: Ask if there is blood in the stools.
l The child who is passing blood in the stools is having dysentery and needs referral.
Step 2: Assess every child with Diarrhea for dehydration
l Look at the child’s general condition. Is the child lethargic or unconscious?
Is the child restless and irritable?
l Look for sunken eyes.
l Ask the mother to offer the child some water in a cup or spoon. Watch the
child drink. Is the child not able to drink or is drinking poorly? Is the drinking
eagerly, thirsty.
l A child is not able to drink if he is not able to suck or swallow when
offered a drink. A child may not be able to drink because he is lethargic or
unconscious.
51
Newborn and Child Health Training Module - HUP

6.4 Page 54

▲back to top


l A child is drinking poorly if the child is weak and cannot drink without help. He may be able to
swallow only if fluid is put in his mouth.
l A child has the sign drinking eagerly, thirsty if it is clear that
the child wants to drink. Look to see if the child reaches out for
the cup or spoon when you offer him water. When the water
is taken away, see if the child is unhappy because he wants to
drink more.
l If the child takes a drink only with encouragement and does
not want to drink more, he does not have the sign “drinking
eagerly, thirsty”.
l PINCH the skin of the abdomen. Does it go back: Very slowly
(longer than 2 seconds) or slowly.
Signs/Symptoms
Two of the following signs:
• Lethargic or unconscious
• Sunken eyes
• Not able to drink or drinking
poorly
• Skin pinch goes back very
slowly
Status
Severe
Dehydration
Action to be taken
Refer URGENTLY to hospital with
mother giving frequent sips of
ORS/ fluids on the way
Two of the following signs:
• Restless, irritable
• Sunken eyes
• Drinks eagerly, thirsty
• Skin pinch goes back slowly
Some Dehydration
• Refer the case urgently
• Continuous breast feeding and
ORS
• Not enough signs to classify as
some or severe dehydration
• Passing urine normally
• Diarrhea for 14 days or more
• Blood in the stool
No Dehydration
Severe Persistent
Diarrhea
Dysentery
• Give fluid and food to treat
Diarrhea at home (Plan A)
• Follow-up in 2 days if not
improving
Refer to hospital
Refer to hospital
52
Newborn and Child Health Training Module - HUP

6.5 Page 55

▲back to top


Step 3: How to Classify Diarrhea
Oral Rehydration Therapy:
Oral Rehydration Therapy (ORT) is a simple treatment for dehydration associated with diarrhea,
particularly gastroenteritis, such as that caused by cholera or rotavirus. ORT consists of a solution
of salt and sugars that is taken orally. It is important in developing countries, where it saves life
of million children every year, diarrhea being second leading cause of death after pneumonia in
children under five years of age.
Oral Rehydration Salts (ORS) is a special drink that consists of a combination of dry salts. When
properly mixed with safe/clean water, the solution can help to rehydrate the body when a lot of
fluids have been lost due to diarrhea.
ORS and its preparation procedure
The following steps must be undertaken carefully while making ORS at home. ORS as mentioned
earlier is available free of cost at any nearest health facility:
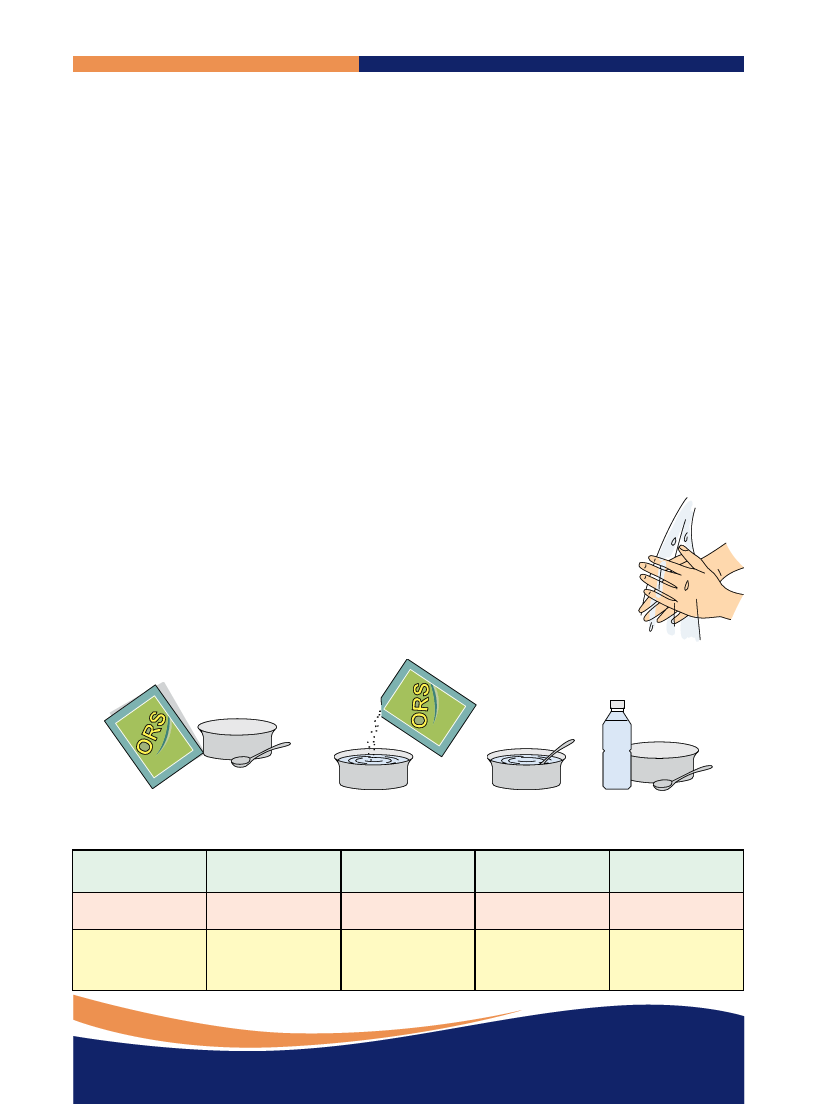
1. Wash the hands properly with soap before making ORS.
2. Take one clean vessel, a table spoon and a jar with the capacity of at least 1
litre.
3. Pour the content of the ORS packet into the jar having 1 litre of clean water
(preferably boiled and cooled down, if distilled water is unavailable).
4. Stir the solution well (for 2 minutes) until the powder is completely mixed.
5. Pour the contents of the jar into the vessel.
6. Keep the solution in the vessel covered to check dust and flies.
7. The solution is good only for 24 hours, so left over must be thrown and the
process must be restarted from the very first step, on the preceding day.
1 ltr.
1 ltr.
1 ltr.
1 ltr.
Table representing the quantity of ORS as per the age of the baby:
Age
Weight
Up to 4 months
<6 Kg
4 months up to
12 months
6-10 Kg
12 months up to 2 years up to 5
2 years
years
10-12 Kg
12-20 Kg
Amount of
200-450
fluid (ml) over 4
hours
450-800
800-960
960-1600
53
Newborn and Child Health Training Module - HUP

6.6 Page 56

▲back to top


Home Made ORS:
In case, the ORS packet is unavailable at home
and it’s an emergency to rehydrate the infant, the
following points should be undertaken.
++
Preparation of homemade ORS:
Water
Sugar
Salt
1. Wash the hands properly with soap before
starting the procedure.
2. Take one clean vessel, a table spoon, a tea spoon
and a jar with the capacity of at least 1 litre.
3. Pour a litre of clean water (preferably boiled and
cooled down, if distilled water is unavailable) in
the jar.
4. Add 50 grams of sugar (8 spoons) and 5 grams
of salt (a teaspoon) in the jar and stir it well till
everything is mixed properly.
5. The juice of half lime can be added for taste and
better absorption.
6. Pour the final content in the jar and cover it with
a lid to check flies and dust.
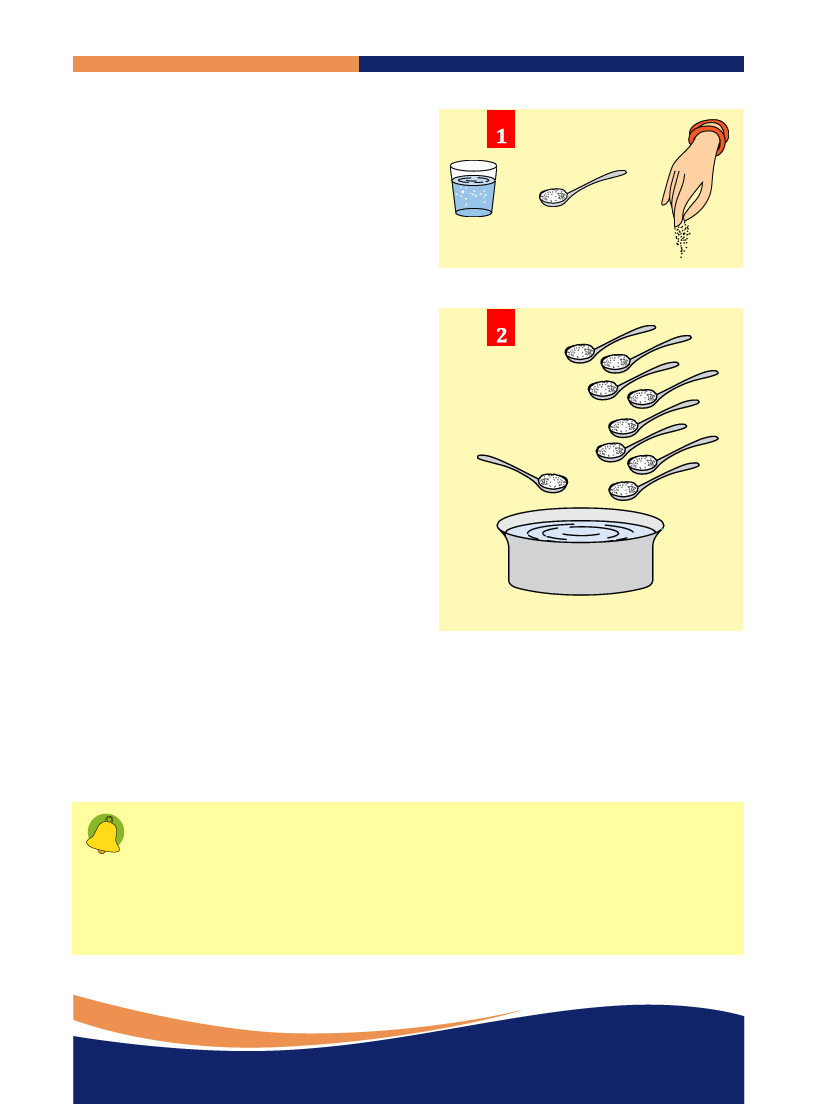
In this picture, figure one demonstrates the preparation of homemade ORS using spoon and
hand for a glass of water (200 ml). While the second figure, portrays the preparation of a
litre of homemade ORS using table spoon and tea spoon. Although homemade ORS is now not
recommended, still in this context, the second figure looks appropriate, as it is easy to mix
the amount of sugar/salt using specified spoons. Any influx or decrease in quantity of the
either elements can provoke severe complication.
1. Salt contains sodium and potassium. Any extra quantity could worsen the
condition.
2. Equivalently, extra amount of sugar can hamper the absorption of required levels of
sodium.
3. In all cases the recommendation is providing ORS, available at the Health Facility /
health care provider to avoid any mishap or further complication.
54
Newborn and Child Health Training Module - HUP

6.7 Page 57

▲back to top


Home Available Fluids (HAF)
To prevent too much liquid being lost from the child’s body, an effective oral rehydration solution
can be made using ingredients found in almost every household. One of these drinks should be given
to the child every time a watery stool is passed.
The following traditional remedies make highly effective oral rehydration solutions and are suitable
drinks to prevent a child from losing too much liquid during diarrhea:
1) Breast milk
2) Gruels (diluted mixtures of cooked cereals and water)
3) Green Coconut Water
4) Rice water - Congee
5) Fresh fruit juice
6) Weak tea
7) Carrot/vegetable soup
If nothing else is available, give water from the cleanest possible source (if possible brought to the
boil and then cooled).
55
Newborn and Child Health Training Module - HUP

6.8 Page 58

▲back to top


Plan A: If the Child has Diarrhea but no Dehydration:
l If the child is still being breastfed, the mother is to be encouraged to continue breastfeeding,
longer at each feed.
l If passing frequent watery stools:
1. For a child less than six months of age, give ORS with clean and boiled water, in addition to
breast milk. No other fluid or food to be added.
2. If the child is older than six months and not being exclusively breastfed, give ORS solution
and home available fluids. A fluid that is available at home include soups, green coconut
water, rice or pulse-based drinks, porridge, lime juice with salt and sugar.
Amount of ORS to be given
Recommended amount of ORS has to be given as per the guidance of Health Facility personnel
after a period of 4 hours:
Age
Weight
Up to 4 months
<6 Kg
4 months up to
12 months
6-10 Kg
12 months up to 2 years up to 5
2 years
years
10-12 Kg
12-20 Kg
Amount of
200-450
fluid (ml) over 4
hours
450-800
800-960
960-1600
56
Newborn and Child Health Training Module - HUP

6.9 Page 59

▲back to top


* Use the child’s age only when you do not know the weight.
1) If the child wants more ORS than the prescribed above amount, give it.
2) For infants below 6 months who are not breastfed, also give 100-200 ml clean water during this
period only.
After 4 hours:
1) Reassess the child and classify the dehydration type.
2) Select the appropriate plan to continue treatment.
3) Begin feeding the child in the clinic.
If the mother leaves before completion of treatment:
1) Show her to prepare ORS solution at home.
2) Show her how much ORS is to be given to finish 4 hour treatment at home.
3) Demonstrate her, the use of salt-sugar solution at home.
Explain her, the four rules of treatment:
a) Give Extra Fluid.
b) Give Zinc (age 2 months up to 5 years and as per the advice of MO).
c) Continue Feeding (exclusive breastfeeding if age less than 6 months).
d) When to return to the Health Centre for check up.
*Source: IMNCI (book and CD), WHO, UNICEF
Tips to help the mother:
l Give frequent small sips from the cup.
l If the child vomits, wait for 10 minutes.
l Then continue but more slowly.
l Continue giving extra fluids until the Diarrhea stops.
l Continue feeding/breastfeeding whenever the child wants.
57
Newborn and Child Health Training Module - HUP

6.10 Page 60

▲back to top


Plan B: Child has Dehydration:
In case the child develops signs of dehydration, then refer immediately to the nearest health
facility.
Refer Immediately
Continued Breastfeeding during diarrhea:
When the baby is under 6 months:
1) Stick to exclusive breastfeeding till the child is six months old.
2) Clean water (boiled and cooled down) can be given only for this period.
3) Give ORS solution as per the advice of the MO.
When the baby is above 6 moths but <2 years
1) Breastfeeding during diarrhoea curbs down the deficiency of fluids from the
body.
2) Apart from ORS, it acts as a life saver.
3) It provides adequate supplements required as a part of rehydration therapy.
58
Newborn and Child Health Training Module - HUP

7 Pages 61-70

▲back to top


7.1 Page 61

▲back to top


Prevention of Diarrhea:-
HUP LW/CC should create awareness on the following preventive steps:-
1. Hand washing with soap and water before eating, before feeding the child, before preparing the
food, after defecation, after cleaning the child and after disposing off a child’s stool should be
promoted.
2. All families must be motivated to have a clean and functioning toilet.
3. In case there is no latrine, the family members should defecate at distance away from the houses,
paths, places where the children play and water supply sources.
4. Improved disposal of excreta- All faeces of infants and children should be disposed off in a sanitary
latrine or toilet or buried.
5. Avoid intake of contaminated foods.
Need for referral: Counsel the mother to take child to the nearest health facility
if the child:
l Becomes sick
l Not able to drink or breastfeed
l Drinks poorly
l Develops fever
l Has blood in stool
59
Newborn and Child Health Training Module - HUP

7.2 Page 62

▲back to top


Session 14: Management of Acute Respiratory Infections (ARIs)
Objective:
At the end of the session, the HUP link worker/Cluster coordinator will be able to:
l Diagnose ARI through measuring fever, observing chest in drawing and breath counting
l Diagnosis and referral of cases
Step 1: Identifying the Signs of ARI
l Ask the mother if the child has cough or difficult breathing. If yes, ask the duration.
l A child with cough (even if mild) for >14 days requires referral.
l Any cough with fever for more than 3 days needs to be referred.
Step 2: Look for Chest-in-drawing
1. Chest in drawing in a child with cough or difficult breathing indicates severe pneumonia, requiring
referral.
2. During normal breathing of an infant, the whole chest wall and abdomen moves out. Likewise,
lower chest wall goes in when the infant breathes in.
3. In infants mild chest in drawing can occur.
4. Mild chest drawing amongst children above 1 year is not normal.
60
Newborn and Child Health Training Module - HUP

7.3 Page 63

▲back to top


A child with chest in drawing must be referred. Count the breathing for one
minute and decide whether the child has normal breathing or fast breathing.
Age
0 to 59 days
2 months up to 12 months
12 months up to 5 years
Fast breathing count
60 breaths per minute or more
50 breaths per minute or more
40 breaths per minute or more
Classification and Management of Cough/Difficulty in Breathing
Signs/symptoms
Any general danger sign or
chest in drawing
Fast breathing
Status
Severe pneumonia
Pneumonia
Action to be taken
REFER URGENTLY to hospital
No sign of pneumonia or very
severe disease
Cough or cold
Advise home care
If cough >14 days, REFER
Home Based Management for Minor Cough and Cold
a) Keep the young child warm and away from the draught.
b) If the child’s nose is blocked and interferes with feeding, clear the nose by putting in nose drops
(boiled and cooled water mixed with salt) and cleaning the nose with a soft cotton wick.
c) Breastfeed frequently and for longer period at each feed.
d) Continue to give normal diet to the child.
e) In case the child is not able to take the normal quantities of food, she/ he should be given small
quantities of foods frequently.
f) Child can also be given foods of thicker consistency such as Khichri, Dalia or Rice in milk etc.
g) Small quantities of oil/ghee should be added to the food to provide extra energy.
h) Give increased amount of fluids like soup of pulses, plain water, etc.
i) After the illness, at least one extra meal should be given to the child for at least a week to help the
child in speedy recovery.
j) Always feed from a cup with spoon and never use a bottle.
k) For babies over 6 months, soothe the throat and relieve cough with home-made cough remedy
(made into tea) such as sugar, ginger, lemon, tulsi leaves or mint, sonf, elaichi, ginger.
61
Newborn and Child Health Training Module - HUP

7.4 Page 64

▲back to top


Any other local practice that is soothing and not harmful can be encouraged.
Danger Signs: Take the Child to a Doctor Immediately
l Breathing fast
l Breathing with difficulty
l Chest in drawing
l Not able to drink or breast feed
l Becomes sicker
l Develops fever
Points to Remember:
l A child with any danger sign or chest in drawing has Severe Pneumonia and
needs urgent referral to hospital.
l A child who has no general danger signs and no chest in drawing but has fast
breathing has Pneumonia. Such a child also needs urgent referral to the nearest
health facility.
l A child who has no general danger signs, no chest in drawing and no fast breathing
has simple cough and cold. The mother of this child should be advised on home
based care and management.
Skills Checklist: Counting Respiratory Rate
l Wait for the child to be quiet and calm.
l Remove your wrist watch and hold it in one hand, close to
the baby’s abdomen.
l Lift up the baby’s shirt so you can see the full breath; the
abdomen rising and falling equals one breath.
l Count the child’s breathing for one minute.
l Record the number of breaths in a minute.
62
Newborn and Child Health Training Module - HUP

7.5 Page 65

▲back to top


PART -C
Important Programs
and Schemes

7.6 Page 66

▲back to top


Session 15: Integrated Management of Neonatal and Childhood Illness (IMNCI)
Objective:
At the end of the session, the HUP link worker/Cluster coordinator will be able to know about
the IMNCI Program.
Integrated Management of Neonatal and Childhood Illness (IMNCI)
Bringing down Infant and Child Mortality Rates and improving Child Survival has been an important
goal of the National Programs of India. Since 1977 to 1992, programs like Universal Immunization;
Oral Rehydration Therapy (ORT) and Management of Acute Respiratory Infections (ARIs) were
implemented to address child mortality as vertical programs. These programs were integrated for
the first time under the Child Survival and Safe Motherhood Program in 1992 and made a part of
the Reproductive & Child Health Program in 1997.
As a result of these programs, the Infant Mortality Rate (IMR) has come down significantly over the
years from 114 in 1980 to 47 (and 31 in Urban areas) in 2010 (SRS, 2010).
However, a large number of children continue to die during the first month of life (neonatal period)
and efforts are required to tackle this situation of high Neonatal mortality in a much focused manner.
At the same time efforts have to be continued to bring down child deaths due to diarrhoea and acute
respiratory infections as these continue to major causes of child mortality.
Under the RCH II National Programme – Implementation Plan, IMNCI approach has been mentioned
as the centre piece of newborn and child health strategy.
The principles of integrated care:
Depending on a child’s age, various clinical signs and symptoms differ in their degrees of reliability
and diagnostic value and importance. Therefore, the IMNCI guidelines recommend case management
procedures based on two age categories:
1. Young infants age up to 2 months
2. Children age 2 months up to 5 years
64
Newborn and Child Health Training Module - HUP

7.7 Page 67

▲back to top


The IMNCI guidelines are based on the following principles:
1. All sick young infants up to 2 months of age must be assessed for “possible bacterial infection
/ jaundice”. Then they must be routinely assessed for the major symptom “diarrhea”.
2. All sick children aged 2 months up to 5 years must be examined for “general danger signs”
which indicate the need for immediate referral or admission to a hospital. They must also be
routinely assessed for major symptoms: cough or difficult breathing, diarrhea, fever and ear
problems.
3. All sick young infants and children 2 months up to 5 years must also be routinely assessed for
nutritional and immunization status, feeding problems, and other potential problems.
4. A combination of individual signs leads to an infant’s or a child’s classification(s) rather than a
diagnosis. Classification(s) indicate the severity of condition(s).
5. They call for specific actions based on whether the infant or child (a) should be urgently referred
to a higher level of care, (b) requires specific treatments (such as antibiotics or anti-malarial
treatment), or (c) may be safely managed at home.
6. The classifications are color coded: “pink” suggests hospital referral or admission, “yellow”
indicates initiation of specific treatment, and “green” calls for home management.
7. The IMNCI guidelines address most, but not all, of the major reasons a sick infant or child is
brought to a clinic. An infant or child returning with chronic problems or less common illnesses
may require special care. The guidelines do not describe the management of trauma or other
acute emergencies due to accidents or injuries. They also do not cover care at birth.
8. IMNCI management procedures use a limited number of essential drugs and encourage active
participation of caretakers in the treatment of infants and children.
An essential component of IMNCI guidelines is the counseling of caretakers
about home care, including counseling about feeding, fluids and when to
return to a health facility.
65
Newborn and Child Health Training Module - HUP

7.8 Page 68

▲back to top


The Integrated Case Management Process-For
Sick Young Infant upto 2 months of age
Outpatient Health Facility
Check for Possible Bacterial Infection/ Jaundice
Assess the Symptom of Diarrhea
Check for Feeding Problem or Malnutrition and
Immunization Status
Check for Other Problems
Classify Conditions and Identify Treatment Actions
according to the color- coded treatment charts
Pink
Urgent Referral
Outpatient Health facility
• Pre - referral
Treatments
• Advise Parents
• Refer young infant
Pink
Urgent Referral
Referral facility
• Emergency Triage and
Treatment
• Diagnosis
• Treatment
• Monitoring and
Follow-up
Yellow
Treatment at Outpatient
Health Facility
Outpatient Health facility
• Treat Local Infection
• Give Oral Drugs
• Advise and Teach
Caretaker
• Follow-up
Green
Home Management
Home Caretaker is
counseled how to:
• Give oral drugs
• Treat local infections
• Continue exclusive
breast feeding
• Keep the young infant
worm.
• When to return
immediately
• Follow-up
66
Newborn and Child Health Training Module - HUP

7.9 Page 69

▲back to top


The Integrated Case Management Process-For
Sick Child from 2 months upto 5 years
Out Patient Health Facility
Check for Danger Signs
• Convulsion
• Lethargy/Unconsciousness
• Inability to Drink or Breastfeed
• Vomiting
Assess Main Symptoms
• Cough/Difficulty in Breathing
• Diarrhoea
• Fever
• Ear Problems
Assess Nutrition And Immunization Status And
Potential Feeding Problems
Check For Other Problems
Classify Conditions And Identify Treatment Actions
According to Color-Coded Treatment Charts
Pink
Urgent Referral
Outpatient Health Facility:
• Pre Referral Treatment
• Advise Parents
• Refer Child
Pink
Urgent Referral
Referral Facility:
• Emergency Trial And
Treatment
• Diagnosis
• Treatment
• Monitoring And Follow
Up
Yellow
Treatment at Outpatient
Health Facility
Outpatient Health Facility:
• Treat Local Infection
• Give Oral Drugs
• Advise And Teach
Caretaker
• Follow Up
Green
Home Management
Home Caretaker is
Counseled on How to:
• Give Oral Drugs
• Treat Local Infections At
Home
• Continue Feeding
• When To Return
Immediately
• Follow Up
67
Newborn and Child Health Training Module - HUP

7.10 Page 70

▲back to top


Session 16: Home Based New Born Care- SEARCH Model
Objective:
At the end of the session, the HUP link worker/Cluster coordinator will be able to: Understand
Home Based New Born Care – SEARCH Model
What is Home-Based Newborn Care?
Key providers of newborn health care in SEARCH’s model are women from community-mothers
and grandmothers- supported by trained community health workers (CHWs) and traditional
birth attendants (TBAs). CHWs visit each woman two times during her pregnancy, provide health
education, attend the delivery for care of newborn, and visit 5 to 13 times during post natal period
The CHWs are trained to resuscitate asphyxiated newborns, support breastfeeding and maintain
body temperature, and recognize and treat sepsis/pneumonia using antibiotics.
The Contents of Home Based New Born Care (HBNC) are:
1. Community sensitization about new born care.
2. Selection and training of a female community health worker (CHW) in each village.
3. Ensuring cooperation of the community, TBA and Health services.
4. Making a list of pregnant women in the community and updating it regularly.
5. Attending Delivery along with TBA and encouraging the family for referral when necessary.
6. Taking charge of baby, immediately after birth.
7. Assessment, and if present management of asphyxia by following a medically approved
algorithm and using bag and mask.
8. Initiation of early breastfeeding and supporting/teaching mother to breastfeed successfully.
9. Assessment for the high risk status of new born on the first day. If present, extra care.
10. Home based care of LBW for preterm neonates.
11. Repeated home visits (7-13) during neonatal period.
12. Early diagnosis of neonates with sepsis by using clinical criteria and treatment with two
antibiotics-co-trimoxazole and gentamicin.
13. Weekly weighing, problem solving and advising.
14. Referral of newborns when necessary.
15. Field supervision (twice in a month) by a doctor or nurse.
16. Support, records, performance-linked remuneration and continued training to CHWs.
17. Vital statistics and service data monitoring.
68
Newborn and Child Health Training Module - HUP

8 Pages 71-80

▲back to top


8.1 Page 71

▲back to top


ANNEXURES

8.2 Page 72

▲back to top


Annexure 1:
Format for first examination
Name of the Mother:
Name of the Father:
(Examine 1 hour after birth but in any case within 6 hours from the birth. If you are not present on
the day of delivery then fill the form on the day of your first visit and write the date of your visit)
1. Date of birth: ________________________________
2. Preterm cut-off date: _____________________ is the baby preterm? : Yes/No
3. Date of first examination? ____________________________________
4. Does mother have any of the following problems?
l Excessive bleeding Yes/No
l Unconscious/Fits Yes/No
Action: If yes refer immediately to hospital
Action taken: Yes/No
5. What was given as the first feed to the baby after birth? __________________
6. At what time was the baby first breast fed? Hrs _______________
How did the baby take feed? (Markü)
i) Forcefully
ii) Weakly
iii) Could not breast feed but has to be fed with spoon
iv) Could neither breast feed nor takes milk given by spoon
7. Does the mother have breast feeding problem? Yes/No
Write the problem ________________________________________________
If breast feeding problem is present help mother to overcome it
First examination of the baby
1. Temperature of the baby (Measure and record): ________________________
2. Eyes: Normal/Swelling/Oozing pus
3. Is umbilical cord bleeding : Yes/No
Action: If yes refer immediately to hospital
Action taken: Yes/No
70
Newborn and Child Health Training Module - HUP

8.3 Page 73

▲back to top


4. Weight: Kg _________Grams _________ Colour on scale: Red/Yellow/Green
5. Record (ü or û)
i) All limbs limp
ii) Feeding less/Stopped
iii) Cry weak/Stopped
Routine Newborn Care
Whether the task was
performed
i) Dry the baby
Yes
No
ii) Keep warm, don’t bathe, wrap in the cloth, keep close to mother Yes
No
iii) Initiate exclusive breast feeding
Yes
No
6. Anything unusual in baby? : Curved limbs/Cleft lip/Other _______________
Name of the Link worker/ Cluster Coordinator:
Date:
Place:
71
Newborn and Child Health Training Module - HUP

8.4 Page 74

▲back to top


Annexure 2:
Checklist for weighing the newborn
1. Availability of a Sling.
2. Availability of a Salter Machine.
3. Availability of a Growth Chart.
4. Take the weight of the baby as per the ten points
discussed in Session 3.
5. The baby is placed horizontally on the sling.
6. Take care that the head of the baby is properly placed on the sling so that while taking weight it
does not fall off the cloth.
7. Most importantly the action has to be performed very carefully where at each juncture the mother
must extend her arms under the baby while performing the act (not touching the baby).
8. After the weight is taken, the same unit must be marked on the growth chart.
72
Newborn and Child Health Training Module - HUP

8.5 Page 75

▲back to top


Annexure 3
Seven steps to measure temperature
1. Take the thermometer out of its storage case, hold at broad end, and clean the shinning tip with
cotton ball (the cotton balls must be boiled for 20 minutes and cooled off )/soaked in spirit.
2. Hold the thermometer upward and place the shining tip in the centre of the armpit. Place arm
against it. Do not change the position.
3. After two minutes remove the thermometer.
4. Read the number displayed.
5. Record the temperature reading.
6. Clean the shining tip of the thermometer with a cotton ball (the cotton balls must be boiled for
20 minutes and cooled off ) soaked in spirit.
7. Place the thermometer back in its storage.
73
Newborn and Child Health Training Module - HUP

8.6 Page 76

▲back to top


74
Newborn and Child Health Training Module - HUP

8.7 Page 77

▲back to top


75
Newborn and Child Health Training Module - HUP

8.8 Page 78

▲back to top


76
Newborn and Child Health Training Module - HUP

8.9 Page 79

▲back to top


77
Newborn and Child Health Training Module - HUP

8.10 Page 80

▲back to top


78
Newborn and Child Health Training Module - HUP

9 Pages 81-90

▲back to top


9.1 Page 81

▲back to top


79
Newborn and Child Health Training Module - HUP

9.2 Page 82

▲back to top


For more information please contact:
Health of the Urban Poor (HUP) Program
Population Foundation of India
B-28, Qutab Institutional Area, New Delhi-110016, Tel: 91-11-43894166, Fax: 91-11-43894199
Email: info_hup@populationfoundation.in, www.populationfoundation.in
This document is made possible by the support of the American people8t0hrough the United States Agency for International Development (USAID). The
contents are the responsibility of the Population Foundation of India and do not necessarily reflect the views of USAID or the United States Government.
Newborn and Child Health Training Module - HUP